Overview
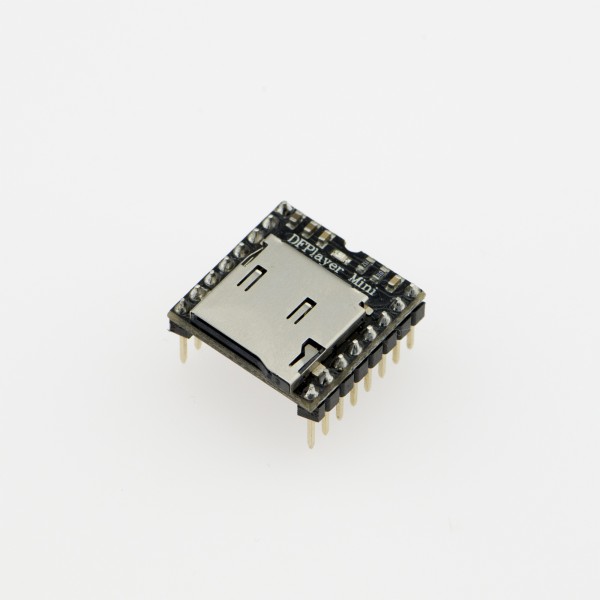
This project aims to create a simple MP3 player using the DFPlayer Mini MP3 module and display the songs being played on a TFT Touch Screen LCD display. The device is capable of Pause and Play operations, Next and Previous song selection, with a simple interface that displays the current song playing.
Hardware Used
Software Used
Library Used
- Arduino.h
- SPI.h
- SofwareSerial.h
- DFMiniMp3.h
- Adafruit_ILI9341.h
- URTouch.h
- Adafruit_GFX.h
- Adafruit_TFTLCD.h
Descriptions
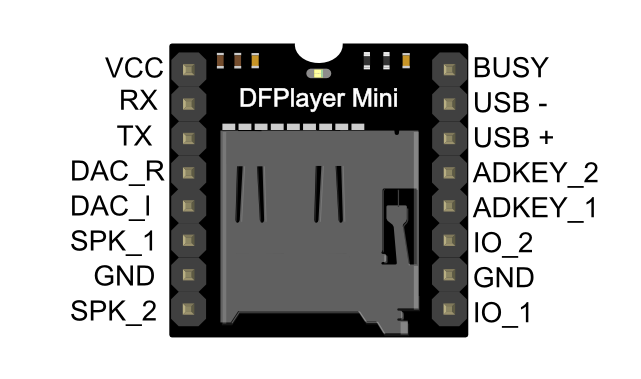
DFPlayer Mini Mp3 Module

- supported sampling rates (kHz): 8/11.025/12/16/22.05/24/32/44.1/48
- 24 -bit DAC output, support for dynamic range 90dB , SNR support 85dB
- fully supports FAT16 , FAT32 file system, maximum support 32G of the TF card, support 32G of U disk, 64M bytes NORFLASH.
- a variety of control modes, I/O control mode, serial mode, AD button control mode
- advertising sound waiting function, the music can be suspended. when advertising is over in the music continue to play
- audio data sorted by folder, supports up to 100 folders, every folder can hold up to 255 songs
- 30 level adjustable volume, 6 -level EQ adjustable
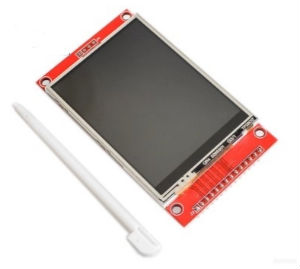
2.8″ TFT LCD Display

2.8 inch TFT LCD display with SPI interface using the ILI9341 driver chip. Screen resolution – 240×320 colour pixels.
Touch responsive screen compatible with the URTouch Arduino library.
Graphics compatible with Adafruit_GFX with Adafruit_ILI9341 Arduino libraries.
STM32 compatible.
Uses 3.3V logic and supply.
LM386 Audio Amplifier Module

The LM386 Audio Amplifier Module is a mono audio amplifier based on the LM386 chip. It operates on a voltage range between 4 V and 12 V. It has an absolute maximum rating of 15 V.
The LM386M version of the chip will provide a typical output of 325 mW, when the supply voltage is 6 V and the speaker load 8 Ω. A 9 V battery power supply will provide an output of around 500 mW. it provides a gain of 200. if you want to adjust the gain, and hence the volume, just rotate the trimmer clockwise or counter clockwise.
Hardware Set-Up
Schematic Diagram


Software Set-up
Code:
#include "Arduino.h"
#include <SoftwareSerial.h>
#include <DFMiniMp3.h>
#include "Adafruit_ILI9341.h"
#include <URTouch.h>
#include <Adafruit_GFX.h>    // Core graphics library
#include <Adafruit_TFTLCD.h> // Hardware-specific library
#include <SPI.h>


class Mp3Notify
{
public:
  static void OnError(uint16_t errorCode)
  {
    // see DfMp3_Error for code meaning
    Serial.println();
    Serial.print("Com Error ");
    Serial.println(errorCode);
  }

  static void OnPlayFinished(uint16_t globalTrack)
  {
    Serial.println();
    Serial.print("Play finished for #");
    Serial.println(globalTrack);
  }

  static void OnCardOnline(uint16_t code)
  {
    Serial.println();
    Serial.print("Card online ");
    Serial.println(code);
  }

  static void OnUsbOnline(uint16_t code)
  {
    Serial.println();
    Serial.print("USB Disk online ");
    Serial.println(code);
  }

  static void OnCardInserted(uint16_t code)
  {
    Serial.println();
    Serial.print("Card inserted ");
    Serial.println(code);
  }

  static void OnUsbInserted(uint16_t code)
  {
    Serial.println();
    Serial.print("USB Disk inserted ");
    Serial.println(code);
  }

  static void OnCardRemoved(uint16_t code)
  {
    Serial.println();
    Serial.print("Card removed ");
    Serial.println(code);
  }

  static void OnUsbRemoved(uint16_t code)
  {
    Serial.println();
    Serial.print("USB Disk removed ");
    Serial.println(code);
  }
};
// instance a DFMiniMp3 object,
// defined with the above notification class and the hardware serial class
//
//DFMiniMp3<HardwareSerial, Mp3Notify> mp3(Serial1);

// Some arduino boards only have one hardware serial port, so a software serial port is needed instead.
// comment out the above definition and uncomment these lines
 SoftwareSerial mySoftwareSerial(A0, A1); // RX, TX
DFMiniMp3<SoftwareSerial, Mp3Notify> mp3(mySoftwareSerial);

#define TFT_DC 9
#define TFT_CS 10
#define TFT_RST 8
#define TFT_MISO 12
#define TFT_MOSI 11
#define TFT_CLK 13


#define t_SCK 3
#define t_CS 4
#define t_MOSI 5
#define t_MISO 6
#define t_IRQ 7

#define TS_MINX 204
#define TS_MINY 195
#define TS_MAXX 948
#define TS_MAXY 910


URTouch ts(t_SCK, t_CS, t_MOSI, t_MISO, t_IRQ);

Adafruit_ILI9341 tft = Adafruit_ILI9341(TFT_CS, TFT_DC, TFT_MOSI, TFT_CLK, TFT_RST, TFT_MISO);
Adafruit_GFX_Button buttons[9];

int x,y;

char NEXT[5] = {"NEXT"};
char PREV[5] = {"PREV"};
char PAUSE[5] = {"||"};
char PLAY[5] = {"PLY"};
extern uint8_t myBitmap[];

void waitfortouch(unsigned short int *x,unsigned short int *y){
  do
  {
    delay(10);
    if (ts.dataAvailable() == true)
    {
      ts.read();
      *x = ts.getX();  //Get touch point
      *y = ts.getY();
      return;
      }
  }while(ts.dataAvailable()==false);
}

void setup()
{
   mySoftwareSerial.begin(9600);//initialization for Software Serial
  Serial.begin(115200); // This is the standard baud rate for the Mp3 player

  Serial.println("initializing...");

  tft.begin();  //initialization for tft lcd
  tft.setRotation(3); // set orientation of the display rotation 3 for landscape
  ts.InitTouch();    //initialize touch Screen
  ts.setPrecision(PREC_EXTREME); //set precision on reading data
  tft.fillScreen(ILI9341_BLACK);

  drawBitmap(0,0, myBitmap,320, 240,ILI9341_WHITE);

  mp3.begin();

  uint16_t volume = mp3.getVolume();
  Serial.print("volume ");
  Serial.println(volume);
  mp3.setVolume(15);

  uint16_t count = mp3.getTotalTrackCount();
  Serial.print("files ");
  Serial.println(count);

  Serial.println("starting...");
 mp3.playRandomTrackFromAll();
 ControlBots();


}

void loop()
{
  trcknms();

   waitfortouch(&x,&y);
   if (buttons[0].contains(x,y))
    {
     mp3.nextTrack();

      }

   else if (buttons[1].contains(x,y))
    {
        mp3.prevTrack();
    }
     else if (buttons[2].contains(x,y))
    {
       mp3.pause();
    }
     else if (buttons[3].contains(x,y))
    {
        mp3.start();
    }

}

void ControlBots()
  {
    buttons[0].initButton(&tft,50,220,60,40,ILI9341_WHITE, ILI9341_RED, ILI9341_WHITE,
                      NEXT, 2);
          buttons[0].drawButton();
  buttons[1].initButton(&tft, 260,220,60,40,ILI9341_WHITE, ILI9341_RED, ILI9341_WHITE,
                      PREV, 2);
          buttons[1].drawButton();
  buttons[2].initButton(&tft,120,220,60,40,ILI9341_WHITE, ILI9341_RED, ILI9341_WHITE,
                      PAUSE, 2);
          buttons[2].drawButton();
  buttons[3].initButton(&tft,190,220,60,40,ILI9341_WHITE, ILI9341_RED, ILI9341_WHITE,
                      PLAY, 2);
          buttons[3].drawButton();
  }
void trcknms()
{
  uint16_t curr = mp3. getCurrentTrack();
  if (curr == 1)
  { tft.setCursor(0,30);
    tft.setTextColor(ILI9341_RED, ILI9341_WHITE);
    tft.setTextSize(3);
    tft.print ("  DESPACITO         ");
    }
    if (curr == 2)
  { tft.setCursor(0,30);
    tft.setTextColor(ILI9341_RED, ILI9341_WHITE);
    tft.setTextSize(3);
    tft.print ("THATS WHAT I LIKE");
    }
    if (curr == 3)
  { tft.setCursor(0,30);
    tft.setTextColor(ILI9341_RED, ILI9341_WHITE);
    tft.setTextSize(3);
    tft.print ("  I'M THE ONE        ");
    }

   if (curr == 4)
  { tft.setCursor(0,30);
    tft.setTextColor(ILI9341_RED, ILI9341_WHITE);
    tft.setTextSize(3);
    tft.print ("   HUMBLE            ");
    }
     if (curr == 5)
  { tft.setCursor(0,30);
    tft.setTextColor(ILI9341_RED, ILI9341_WHITE);
    tft.setTextSize(3);
    tft.print ("  SHAPE OF YOU       ");
    }
}
void drawBitmap(int16_t x, int16_t y,
 const uint8_t *bitmap, int16_t w, int16_t h, uint16_t color) {

  int16_t i, j, byteWidth = (w + 7) / 8;
  uint8_t byte;

  for(j=0; j<h; j++) {
    for(i=0; i<w; i++) {
      if(i & 7) byte <<= 1;
      else      byte   = pgm_read_byte(bitmap + j * byteWidth + i / 8);
      if(byte & 0x80) tft.drawPixel(x+i, y+j, color);
    }
  }
}
This is the entire code for the system.
Code Breakdown
class Mp3Notify
{
public:
  static void OnError(uint16_t errorCode)
  {
    // see DfMp3_Error for code meaning
    Serial.println();
    Serial.print("Com Error ");
    Serial.println(errorCode);
  }

  static void OnPlayFinished(uint16_t globalTrack)
  {
    Serial.println();
    Serial.print("Play finished for #");
    Serial.println(globalTrack);
  }

  static void OnCardOnline(uint16_t code)
  {
    Serial.println();
    Serial.print("Card online ");
    Serial.println(code);
  }

  static void OnUsbOnline(uint16_t code)
  {
    Serial.println();
    Serial.print("USB Disk online ");
    Serial.println(code);
  }

  static void OnCardInserted(uint16_t code)
  {
    Serial.println();
    Serial.print("Card inserted ");
    Serial.println(code);
  }

  static void OnUsbInserted(uint16_t code)
  {
    Serial.println();
    Serial.print("USB Disk inserted ");
    Serial.println(code);
  }

  static void OnCardRemoved(uint16_t code)
  {
    Serial.println();
    Serial.print("Card removed ");
    Serial.println(code);
  }

  static void OnUsbRemoved(uint16_t code)
  {
    Serial.println();
    Serial.print("USB Disk removed ");
    Serial.println(code);
  }
};
This is for the Notification function for the status of your Mp3 player and as you can see it is inside a Class function so that it can access functions directly from the library.
void waitfortouch(unsigned short int *x,unsigned short int *y){
  do
  {
    delay(10);
    if (ts.dataAvailable() == true)
    {
      ts.read();
      *x = ts.getX();  //Get touch point
      *y = ts.getY();
      return;
      }
  }while(ts.dataAvailable()==false);
}
This function is for the Touch Screen to get touch points and perform certain conditions.
drawBitmap(0,0, myBitmap,320, 240,ILI9341_WHITE);
This is for the background since the LCD can only read bitmaps in this case we will just convert jpg or png images to byte arrays using http://javl.github.io/image2cpp/.
void loop()
{
  trcknms();

   waitfortouch(&x,&y);
   if (buttons[0].contains(x,y))
    {
     mp3.nextTrack();

      }

   else if (buttons[1].contains(x,y))
    {
        mp3.prevTrack();
    }
     else if (buttons[2].contains(x,y))
    {
       mp3.pause();
    }
     else if (buttons[3].contains(x,y))
    {
        mp3.start();
    }

}
This function is for the buttons to perform operation when it is touched.
For Converting image to byte arrays:


void drawBitmap(int16_t x, int16_t y,
 const uint8_t *bitmap, int16_t w, int16_t h, uint16_t color) {

  int16_t i, j, byteWidth = (w + 7) / 8;
  uint8_t byte;

  for(j=0; j<h; j++) {
    for(i=0; i<w; i++) {
      if(i & 7) byte <<= 1;
      else      byte   = pgm_read_byte(bitmap + j * byteWidth + i / 8);
      if(byte & 0x80) tft.drawPixel(x+i, y+j, color);
    }
  }
}
This is the function to display your bitmap byte array. You can directly copy the routine from your GFX library
Conclusion
This project provided a simple integration of the DFPlayer and the TFT Touch Screen but the components used is not only limited for this project. Depending on your desired output, this project can be improved for modification with the code and the layout of the system .
References
- https://wiki.dfrobot.com/DFPlayer_Mini_SKU_DFR0299#target_6
- http://educ8s.tv/arduino-2-8-ili9341-tutorial/
- https://github.com/Makuna/DFMiniMp3
- http://www.rinkydinkelectronics.com/library.php?id=92
- https://www.petervis.com/Electronics_Kits/lm386-audio-amplifier-module/lm386-audio-amplifier-module.html
- https://learn.adafruit.com/2-8-tft-touchscreen/overview
The post Mini MP3 Player Using DFPlayer Mini Mp3 Module with 2.8″ TFT Touch Screen LCD appeared first on CreateLabz.


