

Build an Environmental Monitoring Dashboard with CrowPanel 3.5" HMI ESP32 Display
This tutorial shows how to build an Environmental Monitoring Dashboard using the CrowPanel 3.5" HMI ESP32 Display, DHT11 Temperature and Humidity Sensor, LVGL, TFT_eSPI, and Bluetooth Serial. The project reads temperature and humidity data, displays the values on an LVGL dashboard, and sends the sensor readings through Bluetooth Serial.
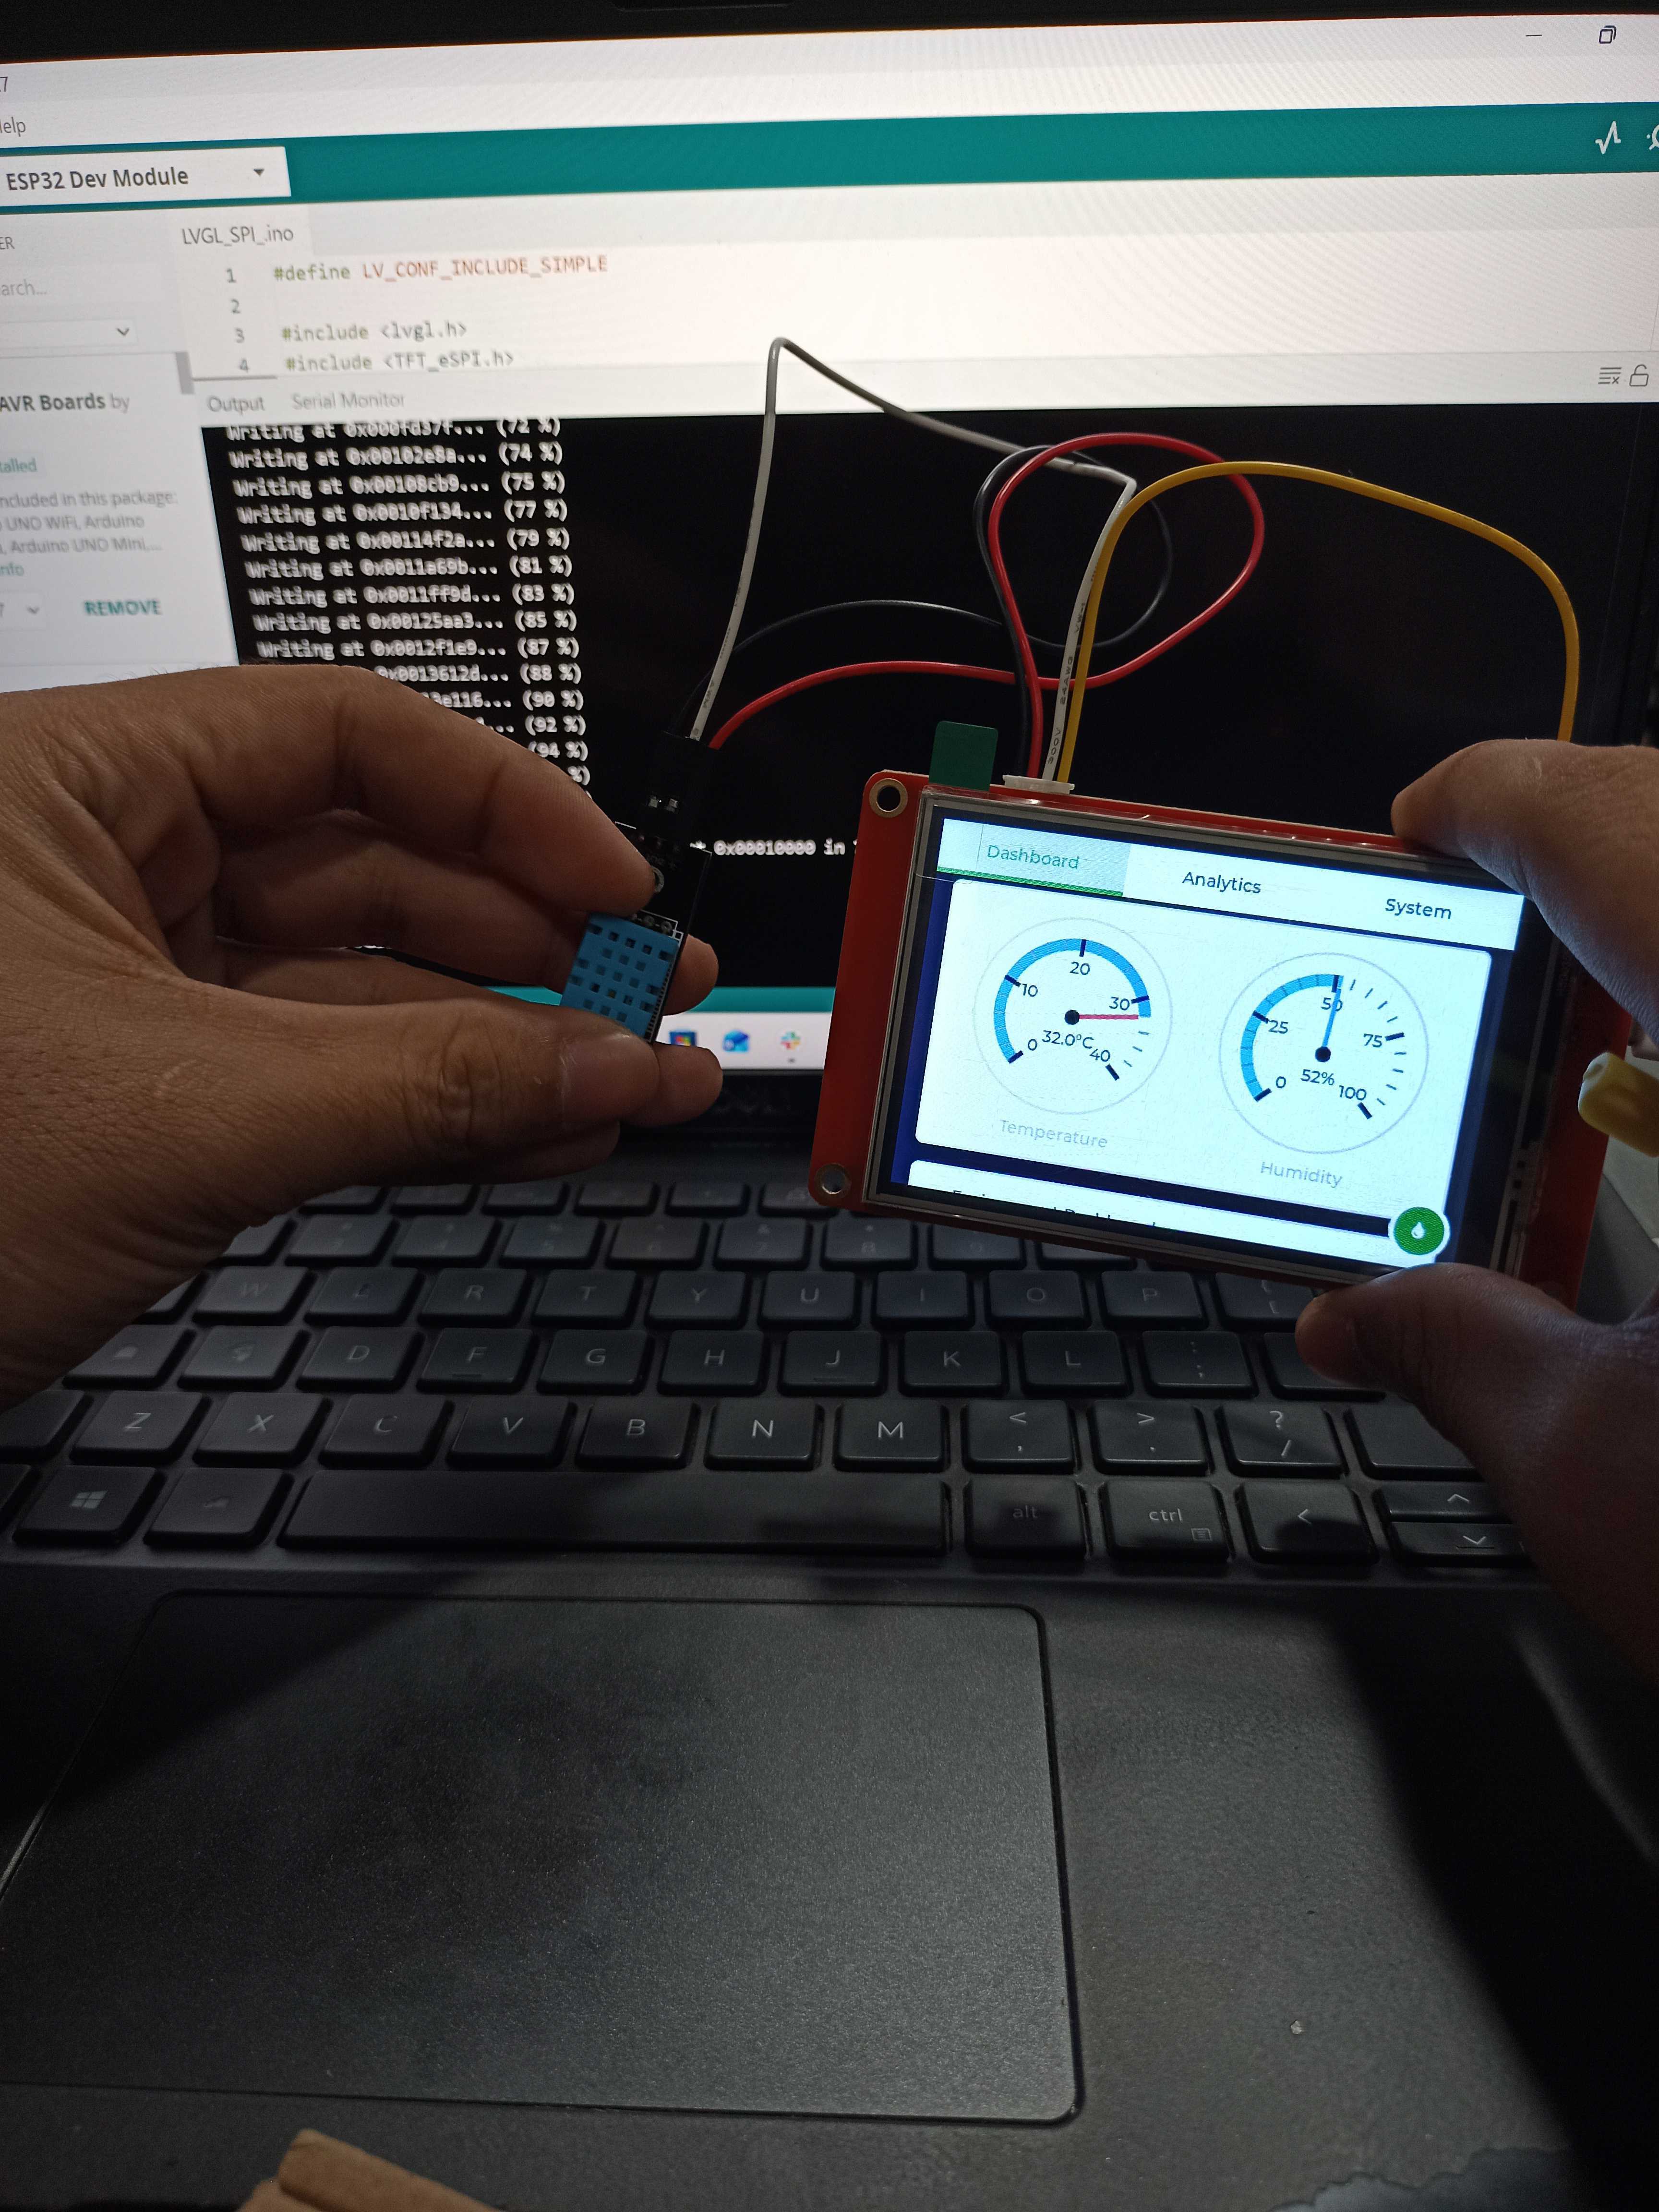
CrowPanel ESP32 3.5 SPI TFT Display used for the environmental monitoring dashboard.
Overview
This tutorial demonstrates how to create a compact environmental monitoring system using an ESP32-based CrowPanel display and a DHT11 sensor. The dashboard displays temperature and humidity readings on the screen, sends the values through Bluetooth Serial, and allows the screen backlight to be controlled remotely using simple Bluetooth commands.
Hardware Components
The hardware includes the CrowPanel 3.5" HMI ESP32 Display and an external DHT11 sensor.
CrowPanel 3.5" HMI ESP32 Display
ESP32-based display module used as the main controller and visual dashboard for the project.
3.5" SPI TFT LCD Display
Built-in 480×320 display used to show the LVGL environmental monitoring dashboard.
DHT11 Temperature and Humidity Sensor
External sensor used to read temperature and humidity values for the dashboard.
Other Hardware
- Resistive touch panel
- Jumper wires
- USB cable for programming
- Computer or laptop for uploading the Arduino project
Project Files
- Arduino project source files
- LVGL UI files
- Project configuration files
- TFT_eSPI display configuration
- Touch calibration settings
Software Used
The software setup uses Arduino IDE, ESP32 board support, LVGL, TFT_eSPI, DHT libraries, and Bluetooth Serial for wireless monitoring and control.
Development and Board Tools
- Arduino IDE 2.3.7
- ESP32 Board Package by Espressif Systems version 2.0.17
- Serial Monitor
- Bluetooth terminal app or PC Bluetooth Serial tool
Libraries and Features
- LVGL Library version 8.3.11
- TFT_eSPI Library version 2.5.43
- DHT Sensor Library by Adafruit
- Adafruit Unified Sensor Library
- Bluetooth Serial Library
Application Discussion
The CrowPanel 3.5" HMI ESP32 Display combines an ESP32 controller, SPI TFT LCD, and resistive touch input. The DHT11 sensor provides temperature and humidity readings, while LVGL and TFT_eSPI work together to create and render the dashboard interface.
CrowPanel 3.5" HMI ESP32 Display
The CrowPanel is an ESP32-based display module with a 480×320 SPI TFT LCD and resistive touch input. It is useful for graphical dashboards, control panels, and sensor monitoring interfaces.
DHT11 Sensor
The DHT11 sensor measures temperature and humidity. In this project, the readings are displayed on the CrowPanel screen and transmitted through Bluetooth Serial approximately every 2 seconds.
Bluetooth Serial
Bluetooth Serial allows the ESP32 to send sensor readings wirelessly and receive simple control commands, such as turning the screen backlight ON or OFF.
LVGL and TFT_eSPI
LVGL is used to create the graphical user interface with widgets such as charts, gauges, panels, labels, and indicators. TFT_eSPI handles communication between the ESP32 and the SPI TFT display, making it important for proper screen initialization, rendering, color output, and display stability.
Hardware Setup
Schematic and Hardware Connections
A schematic or wiring diagram is applicable for this project because an external DHT11 Temperature and Humidity Sensor is connected to the CrowPanel ESP32 board.
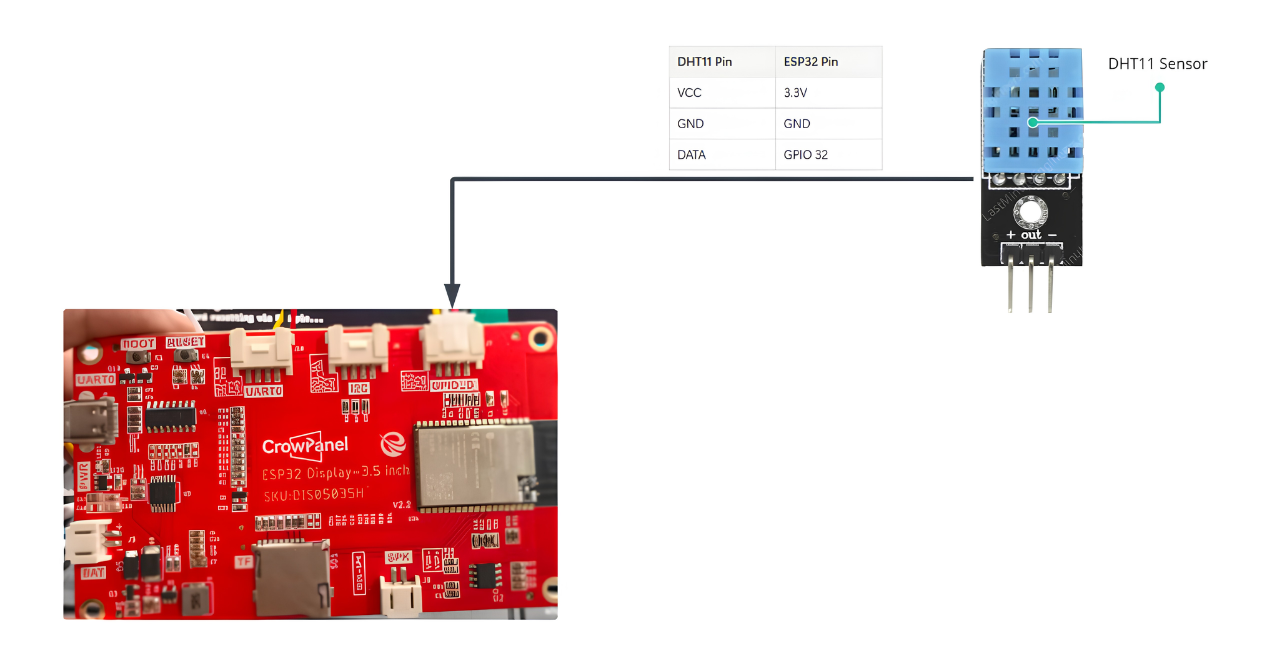
Schematic diagram for connecting the DHT11 sensor to the CrowPanel ESP32 board.
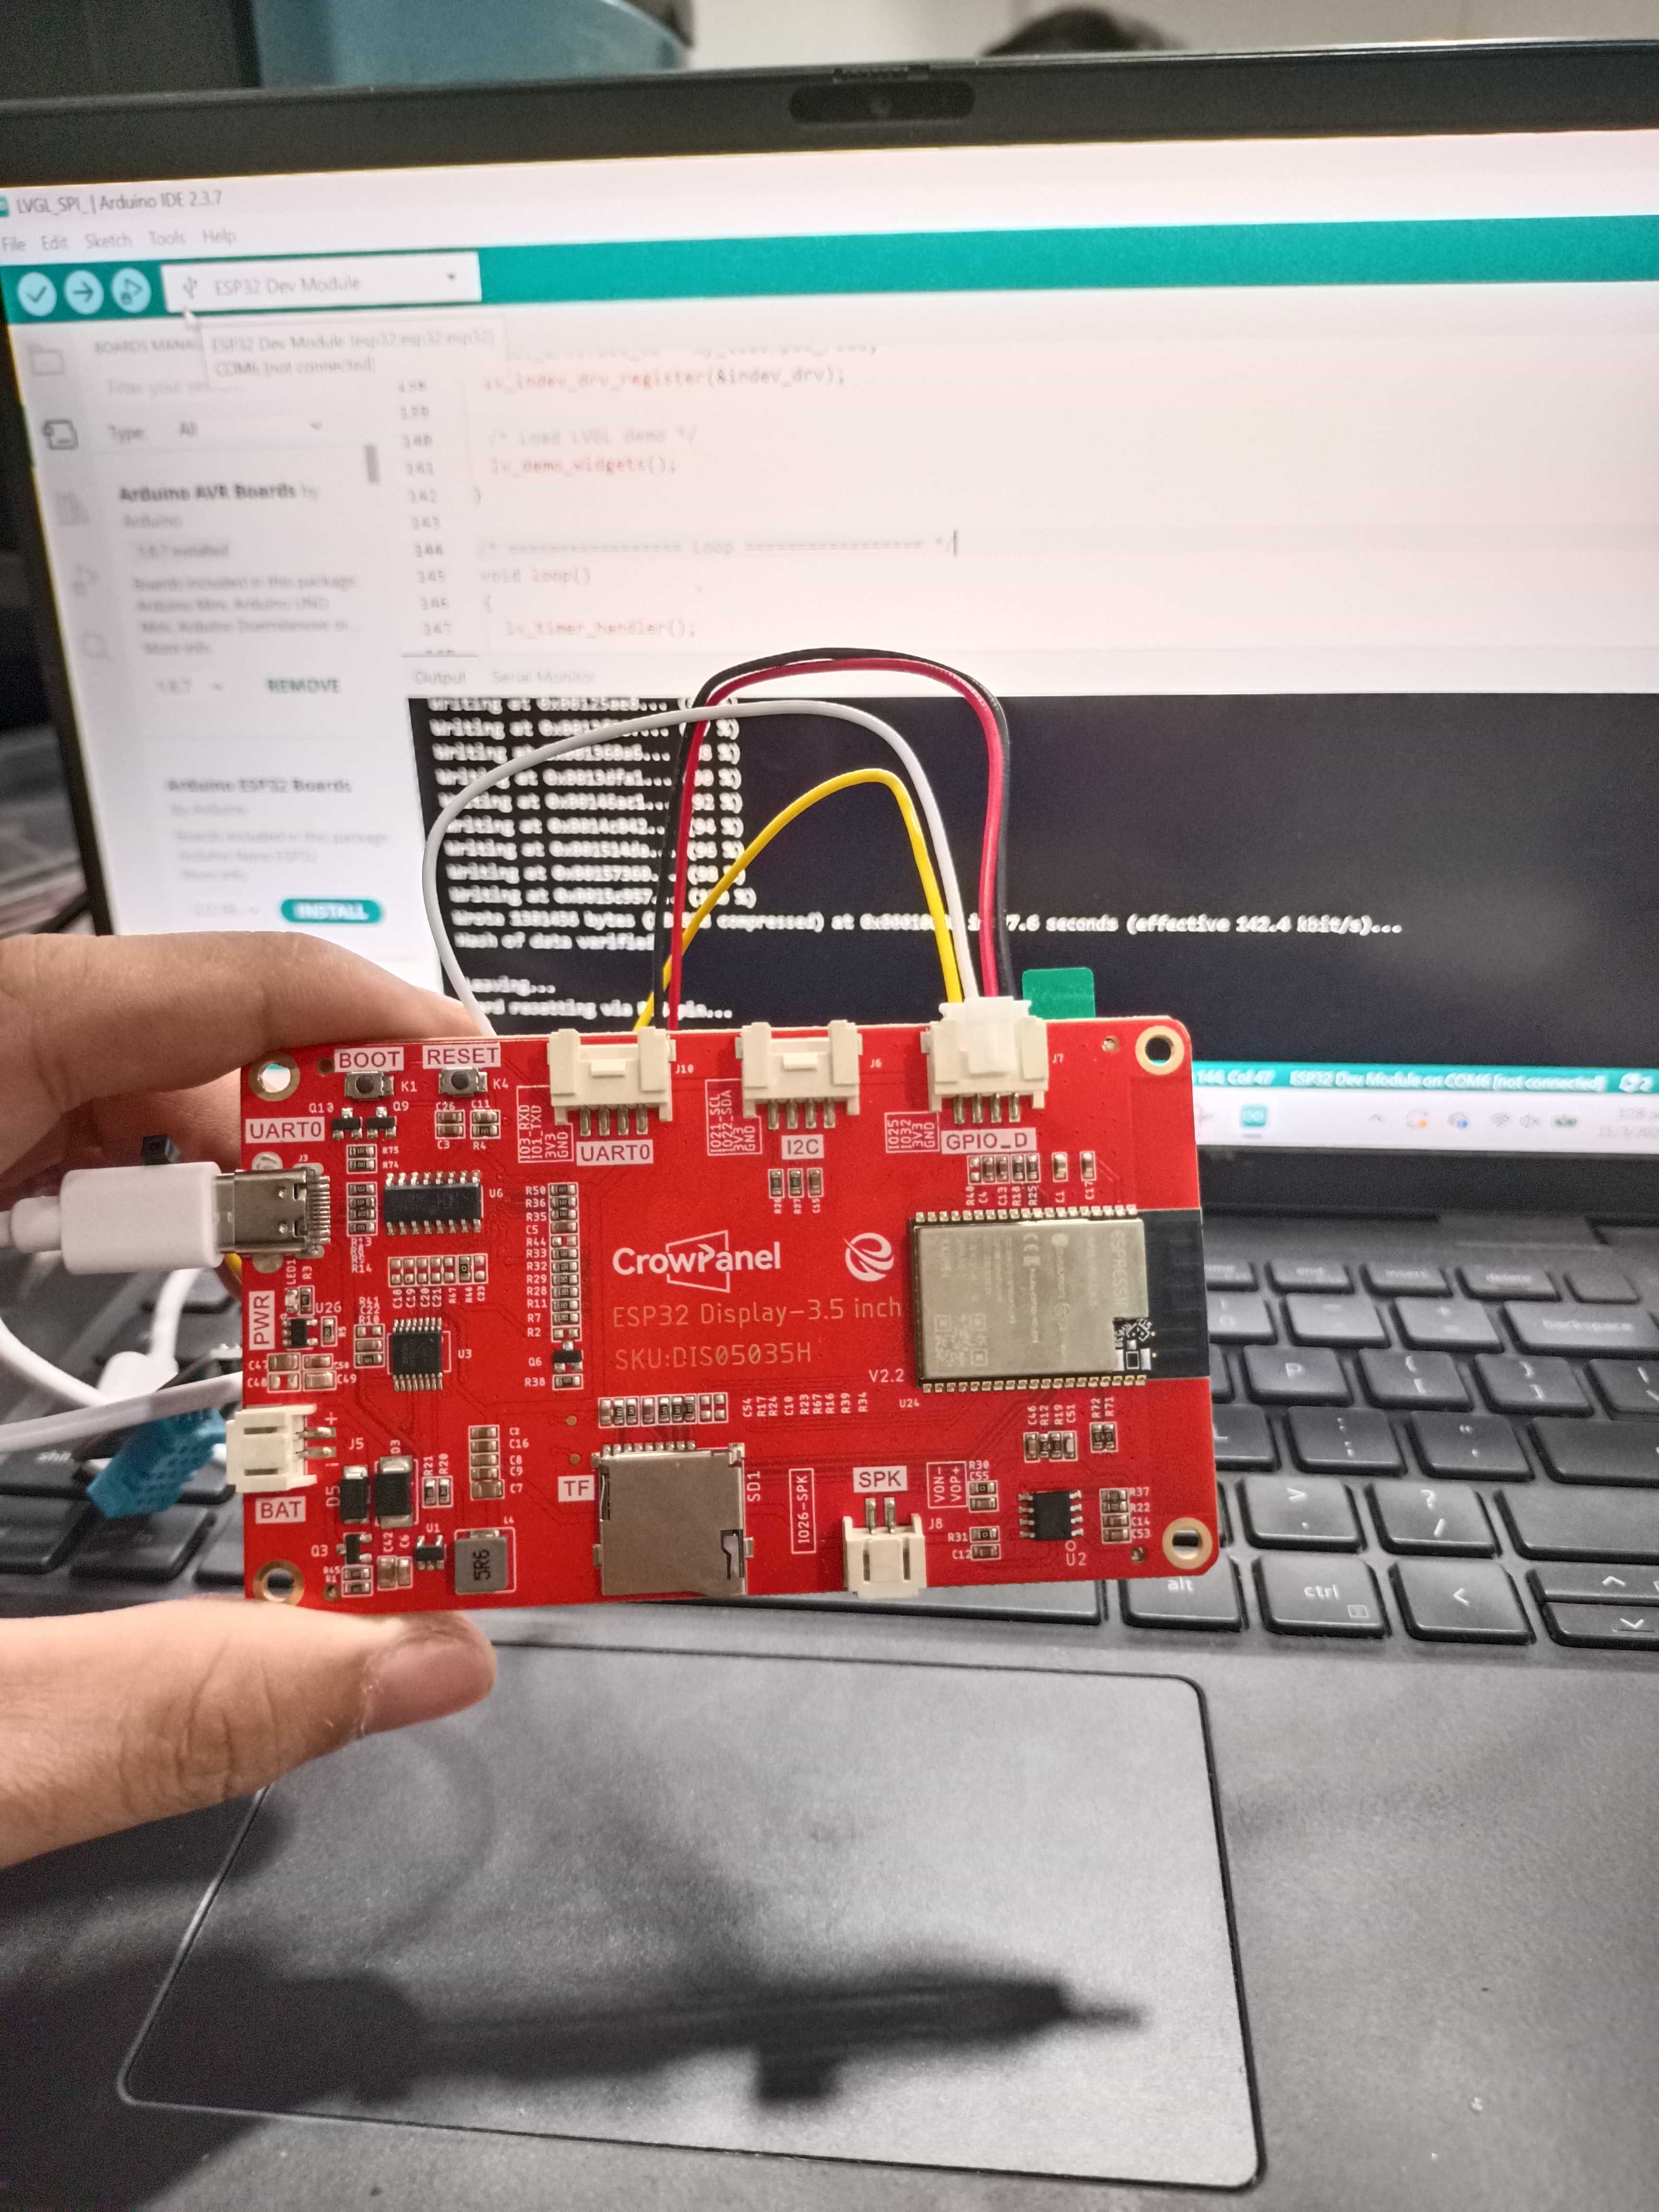
Actual setup of the CrowPanel ESP32 3.5 SPI TFT Display with DHT11 sensor.
Assembly Instructions
Connect Sensor Power
Connect the DHT11 VCC pin to the 3.3V pin of the ESP32.
Connect Sensor Ground
Connect the DHT11 GND pin to the GND pin of the ESP32.
Connect Sensor Data
Connect the DHT11 DATA pin to GPIO 32 of the ESP32.
Connect the CrowPanel
Connect the CrowPanel 3.5" HMI ESP32 Display to the computer using a USB cable.
Upload the Arduino Sketch
Upload the Arduino sketch using the correct board settings. After uploading, the LVGL environmental monitoring dashboard should appear on the display.
Software Setup
Download, Libraries, and Configuration
Before continuing, download or clone the project repository because it contains the required Arduino code, LVGL UI files, and project configuration used in this tutorial.
Download the Repository
Open the repository, click the Code button, select Download ZIP, and extract the ZIP file on your computer.
Open the Arduino Project
Open the Arduino project file from the extracted repository using Arduino IDE.
Required Libraries
Install LVGL version 8.3.11, TFT_eSPI version 2.5.43, DHT Sensor Library by Adafruit, and Adafruit Unified Sensor Library using the Arduino Library Manager. The provided LVGL source reference is github.com/createlabz/lvgl.
Code and Configuration Snippets
The complete project code is available in the project repository. The key configuration snippets below are included because they are important for touch calibration, LVGL frame buffer allocation, and Bluetooth output.
uint16_t calData[5] = {292, 3607, 302, 3486, 7};
tft.setTouch(calData);buf1 = (lv_color_t *)heap_caps_malloc(
screenWidth * screenHeight * sizeof(lv_color_t),
MALLOC_CAP_SPIRAM
);Temp:29C Hum:65%Bluetooth Serial Setup
Code Breakdown / Configuration Breakdown
The code initializes the display, touch interface, LVGL graphics engine, DHT11 sensor, Bluetooth Serial, LVGL frame buffer, timer interrupt, and dashboard UI. It then reads and sends temperature and humidity values every 2 seconds.
lv_demo_widgets()
Loads the LVGL Widgets Demo UI, which serves as the base interface for the environmental monitoring dashboard.
tft.setTouch(calData)
Applies the resistive touch calibration values so the touch coordinates match the display correctly.
lv_tick_inc(1)
Updates the LVGL tick timer so the interface can refresh and respond properly.
heap_caps_malloc()
Allocates memory from PSRAM for the LVGL frame buffer, helping the interface render more smoothly.
Bluetooth Serial
Sends sensor readings wirelessly and receives ON/OFF commands for controlling the screen backlight.
DHT Sensor Readings
Reads temperature and humidity data from the DHT11 sensor and updates the dashboard values.
General Program Workflow
- Initialize Serial communication.
- Initialize Bluetooth Serial.
- Start the DHT11 sensor.
- Initialize the TFT display using TFT_eSPI.
- Initialize the LVGL graphics engine.
- Allocate the LVGL frame buffer in PSRAM.
- Start the LVGL timer interrupt.
- Load the LVGL widgets demo UI.
- Read temperature and humidity every 2 seconds.
- Send sensor data through Bluetooth.
Documentation / Output Guide
After uploading the sketch, the LVGL environmental monitoring dashboard should appear on the CrowPanel display. The DHT11 readings should update approximately every 2 seconds and can also be viewed through Bluetooth Serial.
Video Demonstration
The testing video shows the project demonstration. The viewer should observe the CrowPanel dashboard running and displaying the environmental monitoring interface.
Conclusion
This project demonstrates how to build an Environmental Monitoring Dashboard using the CrowPanel 3.5" HMI ESP32 Display, LVGL, TFT_eSPI, DHT11 sensor, and Bluetooth Serial. The project successfully reads temperature and humidity values, displays them on an LVGL dashboard, and sends the readings through Bluetooth Serial. It also allows the screen backlight to be controlled remotely using Bluetooth commands.
This project can be improved by adding air quality sensors such as MQ135, BME680, or SGP30, WiFi cloud monitoring, MQTT support, SD card data logging, a mobile monitoring application, historical temperature and humidity charts, warning indicators, and custom LVGL widgets.
References
These are the websites and documentation sources used as references. They are listed as names or plain website addresses only.


