

Building a Smart Agriculture Dashboard Using CrowPanel ESP32 Display 5.0" V3 with LVGL
This tutorial shows how to set up a Smart Agriculture Dashboard using the CrowPanel ESP32 Display 5.0" V3 with LVGL and LovyanGFX. The project uses the built-in ESP32-S3-WROOM-1-N4R8 to run a graphical dashboard interface on an 800×480 RGB display.
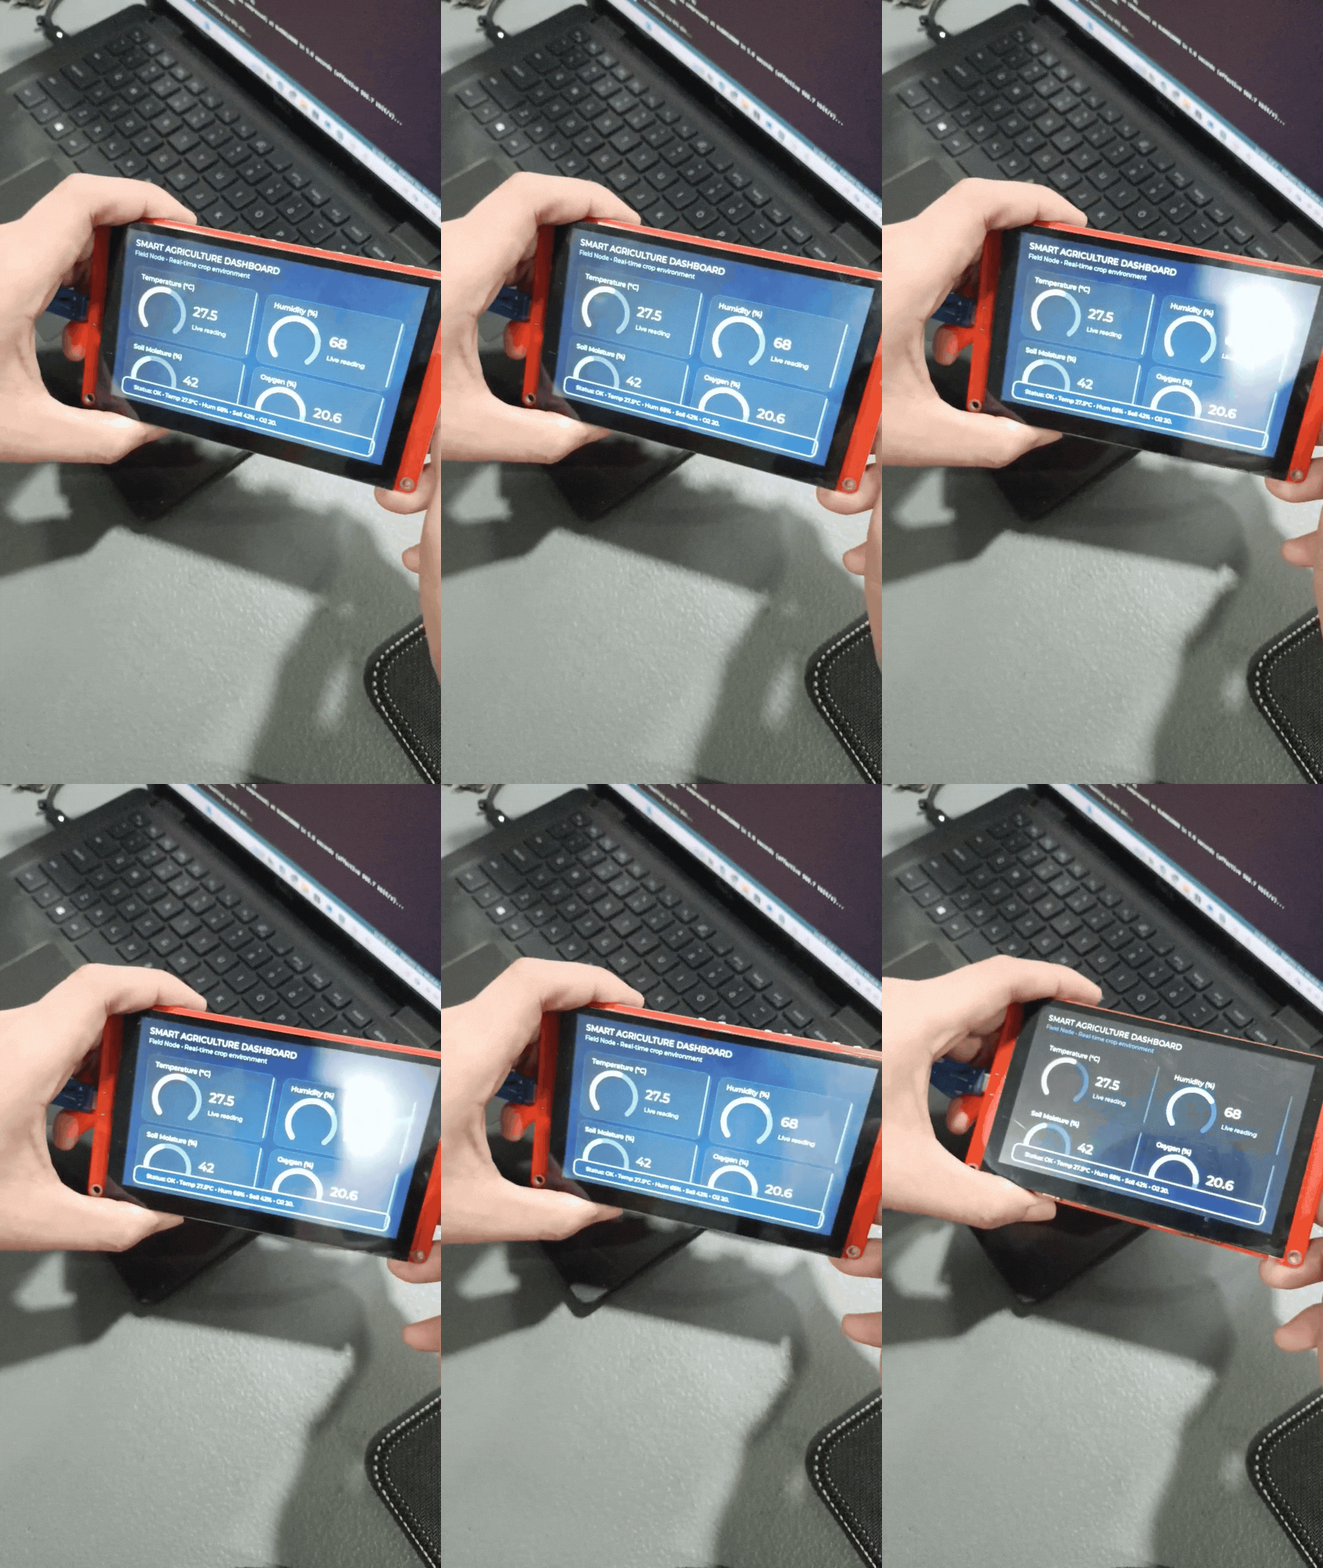
Smart Agriculture Dashboard running on the CrowPanel ESP32 Display 5.0" V3.
Overview
This tutorial focuses on setting up a graphical Smart Agriculture Dashboard using the CrowPanel ESP32 Display 5.0" V3. The dashboard runs on the built-in ESP32-S3 and uses LVGL for the interface and LovyanGFX for RGB display handling.
The included demo sketch creates four live dashboard cards for temperature, humidity, soil moisture, and oxygen. The current values are simulated, so the project can be tested first without connecting external agriculture sensors.
Hardware Components
The project uses the CrowPanel ESP32 Display 5.0" V3 as the main hardware. Since the ESP32-S3 and RGB display are already integrated into one board, the setup is simpler compared to wiring a separate display module to a separate microcontroller.
CrowPanel ESP32 Display 5.0" V3
The main display module used for the Smart Agriculture Dashboard interface.
ESP32-S3-WROOM-1-N4R8
The built-in ESP32-S3 controller used to run the dashboard application.
800×480 RGB Display
The dashboard-ready RGB screen used to display the LVGL interface.
Other Hardware
- 4MB Flash
- 8MB PSRAM
- USB Type-C cable
- Computer or laptop for programming
Project Files
- crowpanel-5-smart-agriculture-lvgl-demo.ino
- gfx_conf.h
- lv_conf.h
Software Used
Software Tools
- Arduino IDE 2.x
- Arduino IDE tested version 2.3.7
- ESP32 Board Package by Espressif Systems
Libraries
- LVGL 8.3.x compatible configuration
- LovyanGFX Library
Application Discussion
The CrowPanel ESP32 Display 5.0" V3 is an ESP32-S3-based display module with a built-in 5.0-inch RGB screen. Since the display and microcontroller are already integrated into one board, it is useful for compact touchscreen dashboard projects such as monitoring panels, control interfaces, and IoT display systems.
LVGL Dashboard UI
The main sketch creates four dashboard cards using LVGL arcs and labels for temperature, humidity, soil moisture, and oxygen.
LovyanGFX RGB Driver
The gfx_conf.h file configures the ESP32-S3 RGB bus pins, panel resolution, pixel clock, timing settings, and PWM backlight.
LVGL Configuration
The lv_conf.h file enables the LVGL features, widgets, fonts, and timing behavior needed by the dashboard interface.
Hardware Setup
Schematic and Hardware Connections
For this demo, the main hardware used is the CrowPanel ESP32 Display 5.0" V3. The ESP32-S3 and display are already built into the same board, so no separate wiring is required for the display.
Assembly Instructions
Connect the CrowPanel
Connect the CrowPanel ESP32 Display 5.0" V3 to the computer using a USB Type-C cable.
Check Board Detection
Make sure the board is detected by the Arduino IDE before uploading the project.
Select ESP32-S3 Settings
Select the correct ESP32-S3 board settings in Arduino IDE.
Upload the Dashboard
Upload the Smart Agriculture Dashboard project to the CrowPanel display.
View the Interface
After successful upload, the dashboard interface should appear on the CrowPanel display.
Software Setup
Arduino IDE, Board Settings, and Code Components
Use Arduino IDE 2.x for this project. The tested Arduino IDE version is 2.3.7. The setup includes the ESP32 board package, LVGL, LovyanGFX, board configuration, flash settings, PSRAM settings, USB settings, and the three source files included below.
ESP32 Board Package Installation
Open Arduino IDE and go to File → Preferences. In the Additional Boards Manager URLs field, add the ESP32 board package URL below. Then go to Tools → Board → Boards Manager, search for esp32, and install esp32 by Espressif Systems.
raw.githubusercontent.com/espressif/arduino-esp32/gh-pages/package_esp32_index.jsonUpload Configuration
These settings are important for the 800×480 LVGL dashboard. Incorrect flash size, missing PSRAM, or wrong USB settings may cause upload errors, boot loops, freezes, or display issues.
Code
The project includes the actual Arduino demo sketch, the LovyanGFX RGB display configuration, and the LVGL configuration file. The main sketch builds the Smart Agriculture Dashboard UI, simulates live readings, and updates the gauges every second.
#define LV_CONF_INCLUDE_SIMPLE
#include <lvgl.h>
#include "gfx_conf.h"

// ===== Display Buffers / Driver =====
static lv_disp_draw_buf_t draw_buf;
static lv_color_t buf1[800 * 20];
static lv_color_t buf2[800 * 20];
static lv_disp_drv_t disp_drv;

// ===== UI Objects =====
static lv_obj_t *arc_temp, *arc_hum, *arc_soil, *arc_o2;
static lv_obj_t *lbl_temp, *lbl_hum, *lbl_soil, *lbl_o2;
static lv_obj_t *lbl_status;

// ===== Demo values =====
static float v_temp = 27.5f;
static float v_hum  = 68.0f;
static float v_soil = 42.0f;
static float v_o2   = 20.6f;

// ================= Display Flush =================
void my_disp_flush(lv_disp_drv_t *disp, const lv_area_t *area, lv_color_t *color_p)
{
  uint32_t w = area->x2 - area->x1 + 1;
  uint32_t h = area->y2 - area->y1 + 1;

  tft.pushImageDMA(area->x1, area->y1, w, h,
                   (lgfx::rgb565_t *)&color_p->full);

  lv_disp_flush_ready(disp);
}

// ================= Create Gauge Card =================
static lv_obj_t* create_gauge_card(lv_obj_t *parent,
                                  int x, int y,
                                  const char *title,
                                  lv_obj_t **arc_out,
                                  lv_obj_t **value_label_out,
                                  int minv, int maxv,
                                  uint32_t arc_color_hex)
{
  lv_obj_t *card = lv_obj_create(parent);
  lv_obj_set_size(card, 360, 190);
  lv_obj_set_pos(card, x, y);
  lv_obj_set_style_radius(card, 22, 0);
  lv_obj_set_style_bg_color(card, lv_color_hex(0x111827), 0);
  lv_obj_set_style_border_width(card, 1, 0);
  lv_obj_set_style_border_color(card, lv_color_hex(0x1F2937), 0);
  lv_obj_set_style_pad_all(card, 14, 0);

  // Title
  lv_obj_t *t = lv_label_create(card);
  lv_label_set_text(t, title);
  lv_obj_set_style_text_color(t, lv_color_hex(0xE5E7EB), 0);
  lv_obj_set_style_text_font(t, &lv_font_montserrat_18, 0);
  lv_obj_align(t, LV_ALIGN_TOP_LEFT, 8, 2);

  // Arc
  lv_obj_t *arc = lv_arc_create(card);
  lv_obj_set_size(arc, 140, 140);
  lv_obj_align(arc, LV_ALIGN_LEFT_MID, 10, 18);
  lv_arc_set_range(arc, minv, maxv);
  lv_arc_set_bg_angles(arc, 135, 45);
  lv_obj_remove_style(arc, NULL, LV_PART_KNOB);
  lv_obj_set_style_arc_width(arc, 14, LV_PART_MAIN);
  lv_obj_set_style_arc_width(arc, 14, LV_PART_INDICATOR);
  lv_obj_set_style_arc_color(arc, lv_color_hex(0x334155), LV_PART_MAIN);
  lv_obj_set_style_arc_color(arc, lv_color_hex(arc_color_hex), LV_PART_INDICATOR);

  // Value
  lv_obj_t *val = lv_label_create(card);
  lv_label_set_text(val, "--");
  lv_obj_set_style_text_font(val, &lv_font_montserrat_36, 0);
  lv_obj_set_style_text_color(val, lv_color_hex(0xF9FAFB), 0);
  lv_obj_align(val, LV_ALIGN_LEFT_MID, 170, -5);

  // Subtext
  lv_obj_t *sub = lv_label_create(card);
  lv_label_set_text(sub, "Live reading");
  lv_obj_set_style_text_font(sub, &lv_font_montserrat_16, 0);
  lv_obj_set_style_text_color(sub, lv_color_hex(0x9CA3AF), 0);
  lv_obj_align(sub, LV_ALIGN_LEFT_MID, 172, 40);

  *arc_out = arc;
  *value_label_out = val;
  return card;
}

// ================= Build UI =================
void create_ui()
{
  lv_obj_t *scr = lv_scr_act();
  lv_obj_set_style_bg_color(scr, lv_color_hex(0x0B1220), 0);

  lv_obj_t *title = lv_label_create(scr);
  lv_label_set_text(title, "SMART AGRICULTURE DASHBOARD");
  lv_obj_set_style_text_color(title, lv_color_hex(0xE5E7EB), 0);
  lv_obj_set_style_text_font(title, &lv_font_montserrat_22, 0);
  lv_obj_align(title, LV_ALIGN_TOP_LEFT, 26, 18);

  lv_obj_t *subtitle = lv_label_create(scr);
  lv_label_set_text(subtitle, "Field Node • Real-time crop environment");
  lv_obj_set_style_text_color(subtitle, lv_color_hex(0x94A3B8), 0);
  lv_obj_set_style_text_font(subtitle, &lv_font_montserrat_16, 0);
  lv_obj_align(subtitle, LV_ALIGN_TOP_LEFT, 26, 48);

  create_gauge_card(scr, 30, 90,  "Temperature (°C)", &arc_temp, &lbl_temp, 0, 50,  0xF87171);
  create_gauge_card(scr, 410, 90, "Humidity (%)",     &arc_hum,  &lbl_hum,  0, 100, 0x60A5FA);
  create_gauge_card(scr, 30, 290, "Soil Moisture (%)",&arc_soil, &lbl_soil, 0, 100, 0x34D399);
  create_gauge_card(scr, 410, 290,"Oxygen (%)",       &arc_o2,   &lbl_o2,   0, 25,  0xA78BFA);

  lv_obj_t *bar = lv_obj_create(scr);
  lv_obj_set_size(bar, 740, 52);
  lv_obj_align(bar, LV_ALIGN_BOTTOM_MID, 0, -14);
  lv_obj_set_style_radius(bar, 16, 0);
  lv_obj_set_style_bg_color(bar, lv_color_hex(0x0F172A), 0);

  lbl_status = lv_label_create(bar);
  lv_obj_set_style_text_font(lbl_status, &lv_font_montserrat_16, 0);
  lv_obj_set_style_text_color(lbl_status, lv_color_hex(0xC7D2FE), 0);
  lv_obj_align(lbl_status, LV_ALIGN_LEFT_MID, 16, 0);

  update_dashboard();   // IMPORTANT initial render
}

// ================= Update Dashboard =================
static void update_dashboard()
{
  lv_arc_set_value(arc_temp, (int)v_temp);
  lv_arc_set_value(arc_hum,  (int)v_hum);
  lv_arc_set_value(arc_soil, (int)v_soil);
  lv_arc_set_value(arc_o2,   (int)v_o2);

  static char b[64];

  snprintf(b, sizeof(b), "%.1f", v_temp);
  lv_label_set_text(lbl_temp, b);

  snprintf(b, sizeof(b), "%.0f", v_hum);
  lv_label_set_text(lbl_hum, b);

  snprintf(b, sizeof(b), "%.0f", v_soil);
  lv_label_set_text(lbl_soil, b);

  snprintf(b, sizeof(b), "%.1f", v_o2);
  lv_label_set_text(lbl_o2, b);

  snprintf(b, sizeof(b),
           "Status: OK • Temp %.1f°C • Hum %.0f%% • Soil %.0f%% • O2 %.1f%%",
           v_temp, v_hum, v_soil, v_o2);

  lv_label_set_text(lbl_status, b);
}

// ================= Simulated Sensor =================
static void simulate_values()
{
  v_temp += 0.1f; if (v_temp > 33.0f) v_temp = 26.0f;
  v_hum  += 0.3f; if (v_hum  > 85.0f) v_hum  = 60.0f;
  v_soil -= 0.6f; if (v_soil < 18.0f) v_soil = 55.0f;
  v_o2   += 0.02f;if (v_o2   > 21.0f) v_o2   = 20.4f;
}

void setup()
{
  Serial.begin(115200);

  tft.begin();
  tft.fillScreen(0x0000);

  lv_init();

  lv_disp_draw_buf_init(&draw_buf, buf1, buf2, 800 * 20);

  lv_disp_drv_init(&disp_drv);
  disp_drv.hor_res = 800;
  disp_drv.ver_res = 480;
  disp_drv.flush_cb = my_disp_flush;
  disp_drv.draw_buf = &draw_buf;
  lv_disp_drv_register(&disp_drv);

  create_ui();
}

void loop()
{
  lv_timer_handler();

  static uint32_t last = 0;
  uint32_t now = millis();

  if (now - last >= 1000)
  {
    last = now;
    simulate_values();
    update_dashboard();
  }

  delay(5);
}#pragma once
#define LGFX_USE_V1
#include <LovyanGFX.hpp>
#include <lgfx/v1/platforms/esp32s3/Panel_RGB.hpp>
#include <lgfx/v1/platforms/esp32s3/Bus_RGB.hpp>
#define screenWidth 800
#define screenHeight 480
class LGFX : public lgfx::LGFX_Device
{
public:
lgfx::Bus_RGB _bus;
lgfx::Panel_RGB _panel;
lgfx::Light_PWM _light;
LGFX(void)
{
{
auto cfg = _panel.config();
cfg.memory_width = screenWidth;
cfg.memory_height = screenHeight;
cfg.panel_width = screenWidth;
cfg.panel_height = screenHeight;
_panel.config(cfg);
}
{
auto cfg = _bus.config();
cfg.panel = &_panel;
cfg.pin_d0 = GPIO_NUM_8;
cfg.pin_d1 = GPIO_NUM_3;
cfg.pin_d2 = GPIO_NUM_46;
cfg.pin_d3 = GPIO_NUM_9;
cfg.pin_d4 = GPIO_NUM_1;
cfg.pin_d5 = GPIO_NUM_5;
cfg.pin_d6 = GPIO_NUM_6;
cfg.pin_d7 = GPIO_NUM_7;
cfg.pin_d8 = GPIO_NUM_15;
cfg.pin_d9 = GPIO_NUM_16;
cfg.pin_d10 = GPIO_NUM_4;
cfg.pin_d11 = GPIO_NUM_45;
cfg.pin_d12 = GPIO_NUM_48;
cfg.pin_d13 = GPIO_NUM_47;
cfg.pin_d14 = GPIO_NUM_21;
cfg.pin_d15 = GPIO_NUM_14;
cfg.pin_henable = GPIO_NUM_40;
cfg.pin_vsync = GPIO_NUM_41;
cfg.pin_hsync = GPIO_NUM_39;
cfg.pin_pclk = GPIO_NUM_0;
cfg.freq_write = 16000000;
cfg.hsync_polarity = 0;
cfg.hsync_front_porch = 8;
cfg.hsync_pulse_width = 4;
cfg.hsync_back_porch = 43;
cfg.vsync_polarity = 0;
cfg.vsync_front_porch = 8;
cfg.vsync_pulse_width = 4;
cfg.vsync_back_porch = 12;
cfg.pclk_active_neg = 1;
_bus.config(cfg);
_panel.setBus(&_bus);
}
{
auto cfg = _light.config();
cfg.pin_bl = GPIO_NUM_2;
_light.config(cfg);
_panel.light(&_light);
}
setPanel(&_panel);
}
};
LGFX tft;/**
* @file lv_conf.h
* Simplified LVGL 8.3.x configuration for the CrowPanel 5.0 Smart Agriculture Dashboard demo.
* This keeps the required widgets and fonts used by crowpanel-5-smart-agriculture-lvgl-demo.ino.
*/
#if 1
#ifndef LV_CONF_H
#define LV_CONF_H
#include <stdint.h>
/* Color settings */
#define LV_COLOR_DEPTH 16
#define LV_COLOR_16_SWAP 0
#define LV_COLOR_SCREEN_TRANSP 0
#define LV_COLOR_CHROMA_KEY lv_color_hex(0x00ff00)
/* Memory settings */
#define LV_MEM_CUSTOM 0
#if LV_MEM_CUSTOM == 0
#define LV_MEM_SIZE (128U * 1024U)
#define LV_MEM_ADR 0
#endif
#define LV_MEM_BUF_MAX_NUM 16
#define LV_MEMCPY_MEMSET_STD 0
/* HAL settings */
#define LV_DISP_DEF_REFR_PERIOD 30
#define LV_INDEV_DEF_READ_PERIOD 30
#define LV_TICK_CUSTOM 1
#if LV_TICK_CUSTOM
#define LV_TICK_CUSTOM_INCLUDE "Arduino.h"
#define LV_TICK_CUSTOM_SYS_TIME_EXPR (millis())
#endif
#define LV_DPI_DEF 130
/* Drawing */
#define LV_DRAW_COMPLEX 1
#define LV_SHADOW_CACHE_SIZE 0
#define LV_CIRCLE_CACHE_SIZE 4
#define LV_IMG_CACHE_DEF_SIZE 0
#define LV_GRADIENT_MAX_STOPS 2
#define LV_GRAD_CACHE_DEF_SIZE 0
#define LV_DITHER_GRADIENT 0
#define LV_DISP_ROT_MAX_BUF (10 * 1024)
/* GPU */
#define LV_USE_GPU_ARM2D 0
#define LV_USE_GPU_STM32_DMA2D 0
#define LV_USE_GPU_RA6M3_G2D 0
#define LV_USE_GPU_SWM341_DMA2D 0
#define LV_USE_GPU_NXP_PXP 0
#define LV_USE_GPU_NXP_VG_LITE 0
#define LV_USE_GPU_SDL 0
/* Logging and asserts */
#define LV_USE_LOG 0
#define LV_USE_ASSERT_NULL 1
#define LV_USE_ASSERT_MALLOC 1
#define LV_USE_ASSERT_STYLE 0
#define LV_USE_ASSERT_MEM_INTEGRITY 0
#define LV_USE_ASSERT_OBJ 0
#define LV_ASSERT_HANDLER_INCLUDE <stdint.h>
#define LV_ASSERT_HANDLER while(1);
/* Others */
#define LV_USE_PERF_MONITOR 0
#define LV_USE_MEM_MONITOR 0
#define LV_USE_REFR_DEBUG 0
#define LV_SPRINTF_CUSTOM 0
#define LV_SPRINTF_USE_FLOAT 0
#define LV_USE_USER_DATA 1
#define LV_ENABLE_GC 0
#define LV_BIG_ENDIAN_SYSTEM 0
#define LV_ATTRIBUTE_TICK_INC
#define LV_ATTRIBUTE_TIMER_HANDLER
#define LV_ATTRIBUTE_FLUSH_READY
#define LV_ATTRIBUTE_MEM_ALIGN_SIZE 1
#define LV_ATTRIBUTE_MEM_ALIGN
#define LV_ATTRIBUTE_LARGE_CONST
#define LV_ATTRIBUTE_LARGE_RAM_ARRAY
#define LV_ATTRIBUTE_FAST_MEM
#define LV_ATTRIBUTE_DMA
#define LV_EXPORT_CONST_INT(int_value) struct _silence_gcc_warning
#define LV_USE_LARGE_COORD 0
/* Fonts used by the demo */
#define LV_FONT_MONTSERRAT_8 0
#define LV_FONT_MONTSERRAT_10 0
#define LV_FONT_MONTSERRAT_12 0
#define LV_FONT_MONTSERRAT_14 1
#define LV_FONT_MONTSERRAT_16 1
#define LV_FONT_MONTSERRAT_18 1
#define LV_FONT_MONTSERRAT_20 0
#define LV_FONT_MONTSERRAT_22 1
#define LV_FONT_MONTSERRAT_24 0
#define LV_FONT_MONTSERRAT_26 0
#define LV_FONT_MONTSERRAT_28 1
#define LV_FONT_MONTSERRAT_30 0
#define LV_FONT_MONTSERRAT_32 0
#define LV_FONT_MONTSERRAT_34 0
#define LV_FONT_MONTSERRAT_36 1
#define LV_FONT_MONTSERRAT_38 0
#define LV_FONT_MONTSERRAT_40 1
#define LV_FONT_MONTSERRAT_42 0
#define LV_FONT_MONTSERRAT_44 0
#define LV_FONT_MONTSERRAT_46 0
#define LV_FONT_MONTSERRAT_48 0
#define LV_FONT_MONTSERRAT_12_SUBPX 0
#define LV_FONT_MONTSERRAT_28_COMPRESSED 0
#define LV_FONT_DEJAVU_16_PERSIAN_HEBREW 0
#define LV_FONT_SIMSUN_16_CJK 0
#define LV_FONT_UNSCII_8 0
#define LV_FONT_UNSCII_16 0
#define LV_FONT_CUSTOM_DECLARE
#define LV_FONT_DEFAULT &lv_font_montserrat_14
#define LV_FONT_FMT_TXT_LARGE 0
#define LV_USE_FONT_COMPRESSED 0
#define LV_USE_FONT_SUBPX 0
#define LV_USE_FONT_PLACEHOLDER 1
/* Text settings */
#define LV_TXT_ENC LV_TXT_ENC_UTF8
#define LV_TXT_BREAK_CHARS " ,.;:-_"
#define LV_TXT_LINE_BREAK_LONG_LEN 0
#define LV_TXT_LINE_BREAK_LONG_PRE_MIN_LEN 3
#define LV_TXT_LINE_BREAK_LONG_POST_MIN_LEN 3
#define LV_TXT_COLOR_CMD "#"
#define LV_USE_BIDI 0
#define LV_USE_ARABIC_PERSIAN_CHARS 0
/* Widgets required by the dashboard */
#define LV_USE_ARC 1
#define LV_USE_BAR 1
#define LV_USE_BTN 1
#define LV_USE_BTNMATRIX 1
#define LV_USE_CANVAS 1
#define LV_USE_CHECKBOX 1
#define LV_USE_DROPDOWN 1
#define LV_USE_IMG 1
#define LV_USE_LABEL 1
#if LV_USE_LABEL
#define LV_LABEL_TEXT_SELECTION 1
#define LV_LABEL_LONG_TXT_HINT 1
#endif
#define LV_USE_LINE 1
#define LV_USE_ROLLER 1
#if LV_USE_ROLLER
#define LV_ROLLER_INF_PAGES 7
#endif
#define LV_USE_SLIDER 1
#define LV_USE_SWITCH 1
#define LV_USE_TEXTAREA 1
#if LV_USE_TEXTAREA
#define LV_TEXTAREA_DEF_PWD_SHOW_TIME 1500
#endif
#define LV_USE_TABLE 1
#define LV_USE_ANIMIMG 1
#define LV_USE_CALENDAR 1
#define LV_USE_CHART 1
#define LV_USE_COLORWHEEL 1
#define LV_USE_IMGBTN 1
#define LV_USE_KEYBOARD 1
#define LV_USE_LED 1
#define LV_USE_LIST 1
#define LV_USE_MENU 1
#define LV_USE_METER 1
#define LV_USE_MSGBOX 1
#define LV_USE_SPAN 1
#if LV_USE_SPAN
#define LV_SPAN_SNIPPET_STACK_SIZE 64
#endif
#define LV_USE_SPINBOX 1
#define LV_USE_SPINNER 1
#define LV_USE_TABVIEW 1
#define LV_USE_TILEVIEW 1
#define LV_USE_WIN 1
/* Themes and layouts */
#define LV_USE_THEME_DEFAULT 1
#if LV_USE_THEME_DEFAULT
#define LV_THEME_DEFAULT_DARK 0
#define LV_THEME_DEFAULT_GROW 1
#define LV_THEME_DEFAULT_TRANSITION_TIME 80
#endif
#define LV_USE_THEME_BASIC 1
#define LV_USE_THEME_MONO 1
#define LV_USE_FLEX 1
#define LV_USE_GRID 1
/* File systems and image decoders disabled for this demo */
#define LV_USE_FS_STDIO 0
#define LV_USE_FS_POSIX 0
#define LV_USE_FS_WIN32 0
#define LV_USE_FS_FATFS 0
#define LV_USE_PNG 0
#define LV_USE_BMP 0
#define LV_USE_SJPG 0
#define LV_USE_GIF 0
#define LV_USE_QRCODE 0
#define LV_USE_FREETYPE 0
#define LV_USE_RLOTTIE 0
#define LV_USE_FFMPEG 0
#define LV_USE_SNAPSHOT 0
#define LV_USE_MONKEY 0
#define LV_USE_GRIDNAV 0
#define LV_USE_FRAGMENT 0
#define LV_USE_IMGFONT 0
#define LV_USE_MSG 0
#define LV_USE_IME_PINYIN 0
/* Examples and demos */
#define LV_BUILD_EXAMPLES 1
#define LV_USE_DEMO_WIDGETS 0
#define LV_USE_DEMO_KEYPAD_AND_ENCODER 0
#define LV_USE_DEMO_BENCHMARK 0
#define LV_USE_DEMO_STRESS 0
#define LV_USE_DEMO_MUSIC 0
#endif /* LV_CONF_H */
#endif /* End of content enable */Code Breakdown / Configuration Breakdown
crowpanel-5-smart-agriculture-lvgl-demo.ino
The main sketch initializes LVGL, registers the display driver, creates four gauge cards, simulates sensor values, and refreshes the dashboard every second.
gfx_conf.h
This file configures the 800×480 RGB panel, ESP32-S3 RGB data pins, sync pins, pixel clock, timing settings, and GPIO 2 backlight control.
lv_conf.h
This file enables LVGL 8.3.x settings, fonts, widgets, custom tick source, and the UI components needed by the dashboard.
create_gauge_card()
This helper function creates reusable dashboard cards with an arc gauge, title label, value label, and subtext.
update_dashboard()
This function updates the arc values, numeric labels, and bottom status bar based on the current demo readings.
simulate_values()
This function generates changing demo values for temperature, humidity, soil moisture, and oxygen so the dashboard can be tested without external sensors.
Documentation / Output Guide
After uploading the project, the Smart Agriculture Dashboard interface should appear on the CrowPanel ESP32 Display 5.0" V3. The dashboard shows changing demo values for temperature, humidity, soil moisture, and oxygen.
Conclusion
This project demonstrates how to set up a Smart Agriculture Dashboard using the CrowPanel ESP32 Display 5.0" V3, ESP32-S3-WROOM-1-N4R8, LVGL, and LovyanGFX. With the correct Arduino IDE setup, ESP32 board package, library versions, flash settings, PSRAM settings, USB settings, and project file structure, the CrowPanel can display a graphical dashboard interface suitable for smart agriculture applications.
Related Projects and Improvements
This project can be improved by replacing the simulated readings with actual sensor data and control features for more complete smart farming, greenhouse monitoring, and irrigation control applications.
References
These are the websites and documentation sources used as references. They are listed as names or plain website addresses only, without active external links.


