

Build a Smart Environmental Monitoring Dashboard with CrowPanel 7" ESP32-S3 HMI Display
This tutorial shows how to build a smart environmental monitoring dashboard using the CrowPanel 7" ESP32-S3 HMI Display with an 800×480 RGB touchscreen, DHT11 temperature and humidity sensor, LVGL dashboard interface, BLE communication, and hardware LED alert indicators.
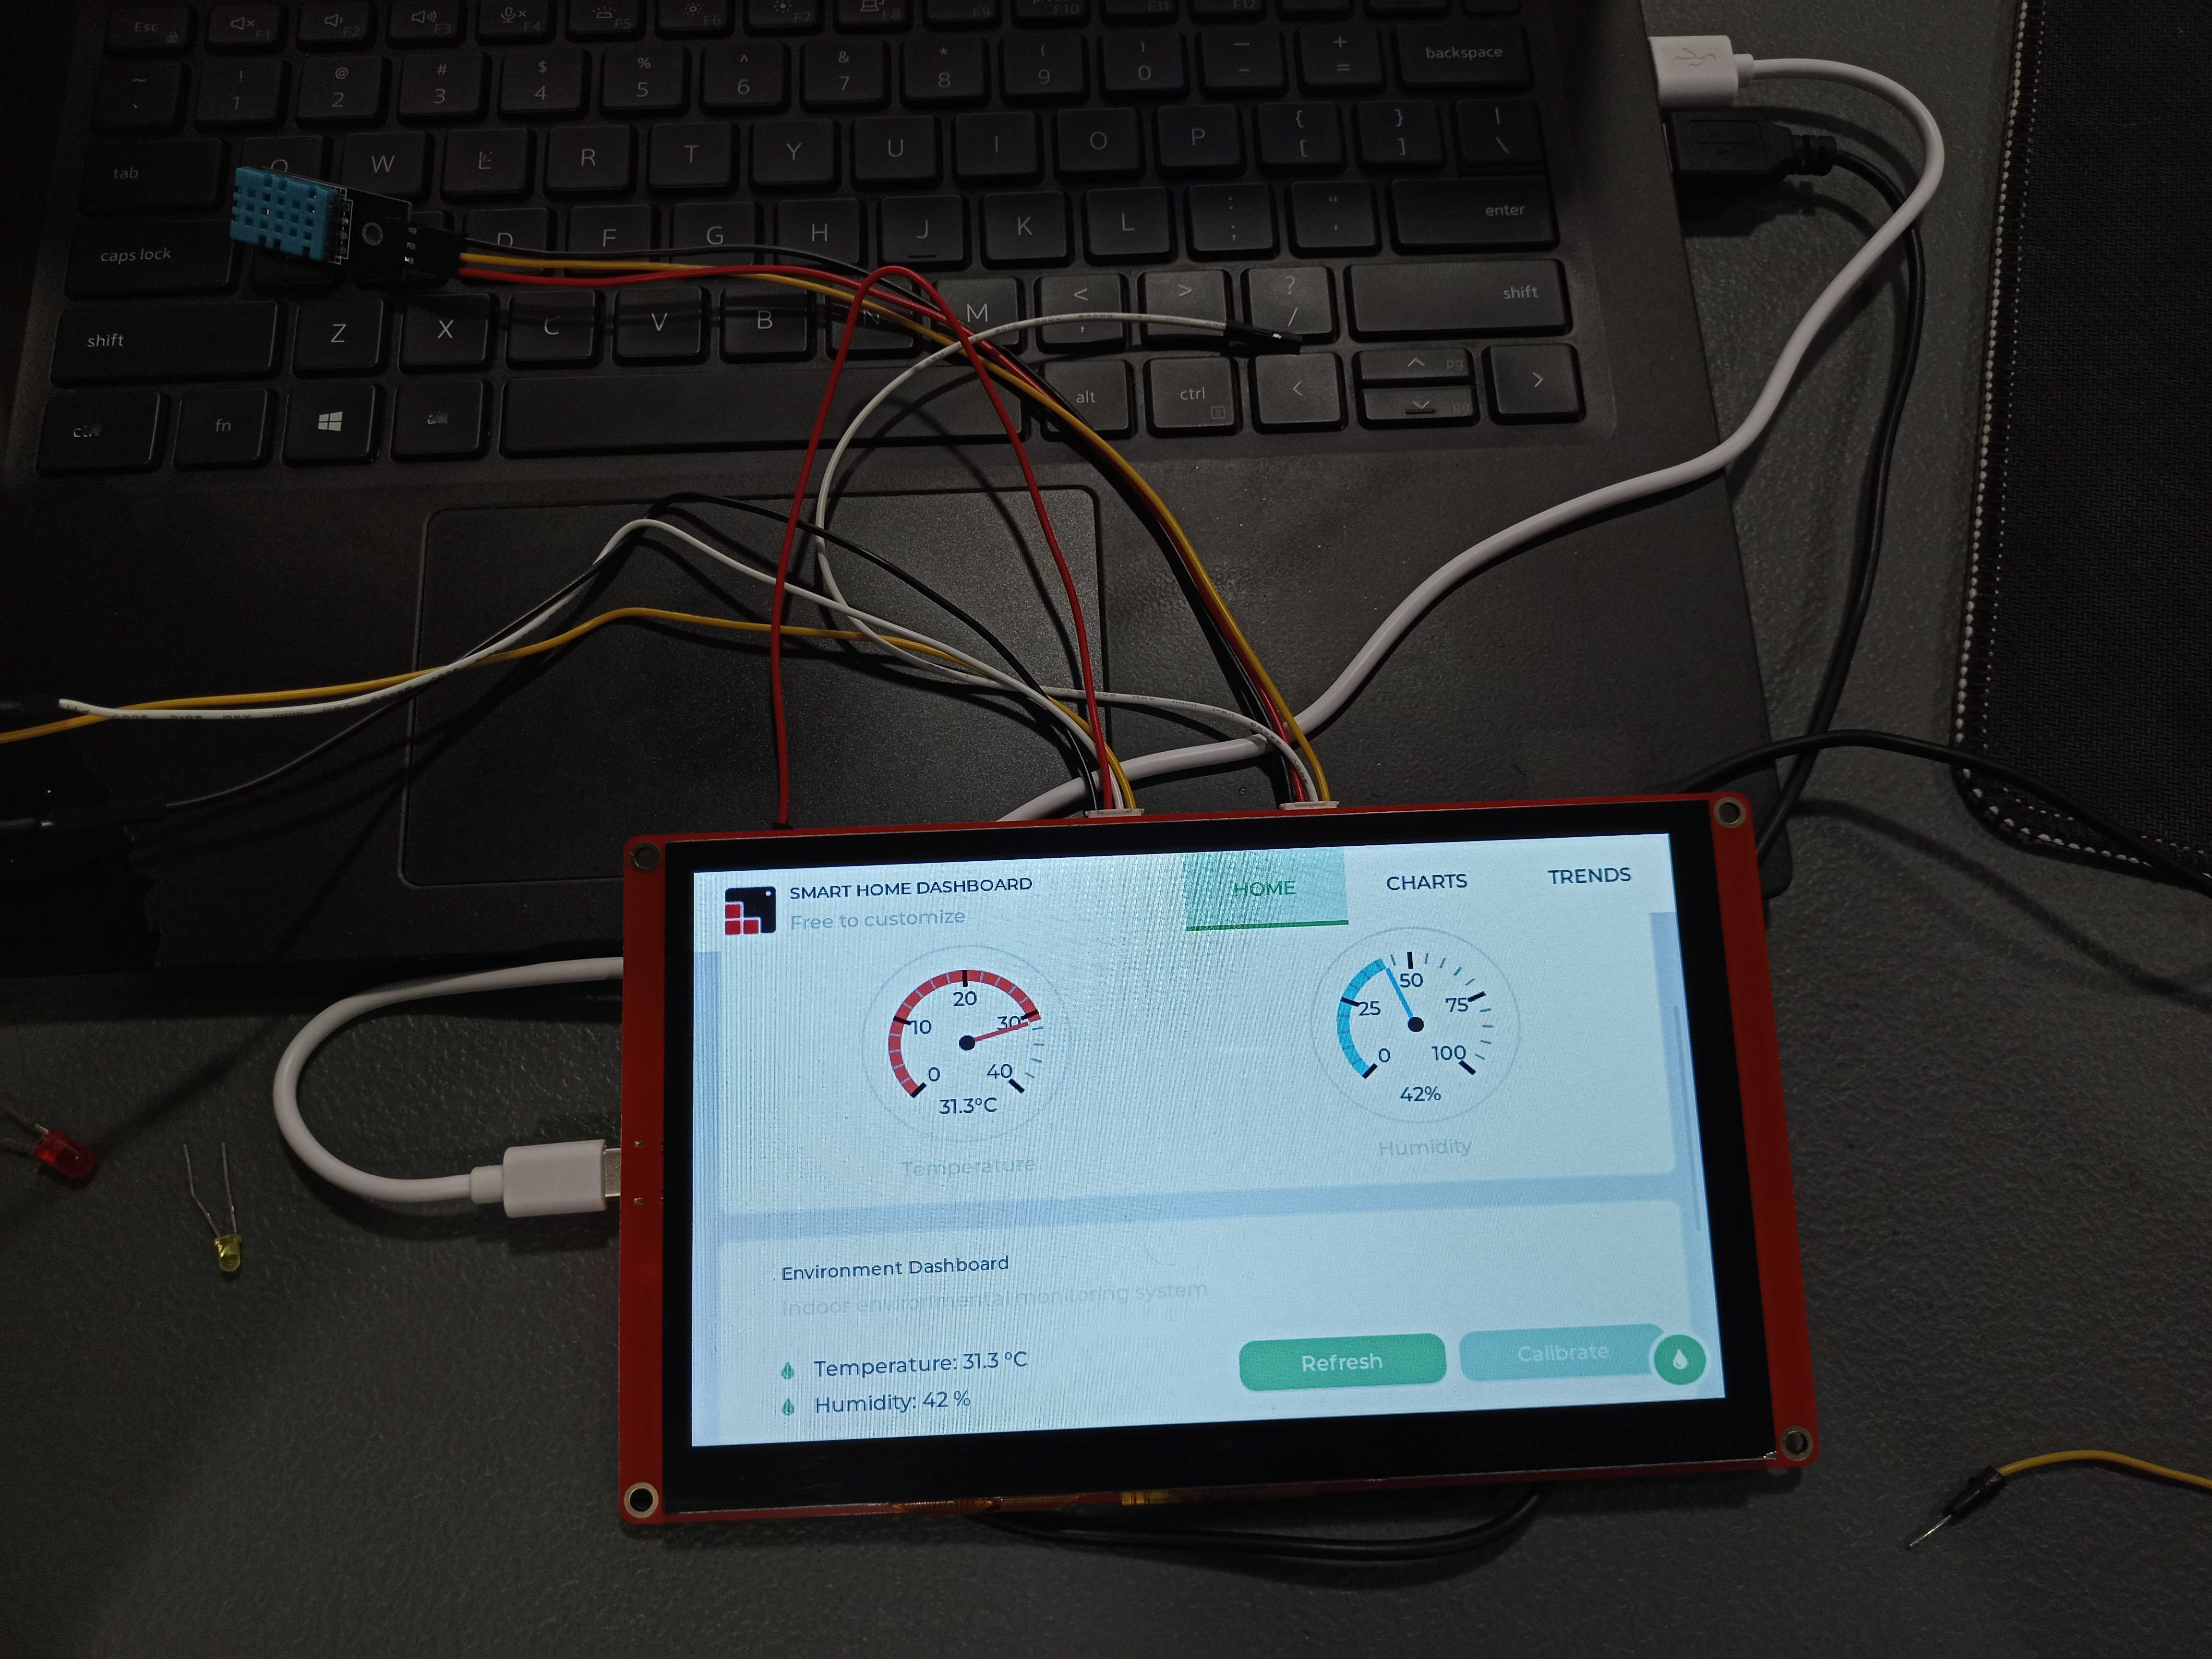
CrowPanel 7" ESP32-S3 HMI environmental monitoring dashboard preview.
Overview
This project displays real-time temperature and humidity data from a DHT11 sensor using an interactive LVGL touchscreen dashboard. It includes gauges, trend charts, adjustable alert thresholds, BLE communication, and LED alert outputs.
This project is useful for smart home dashboards, room monitoring systems, mini weather stations, IoT control panels, and environmental data visualization applications.
Hardware and Software Components
The project uses the CrowPanel 7" ESP32-S3 HMI Display as the main controller and touchscreen interface, a DHT11 sensor for environmental readings, and LEDs as alert indicators.
Hardware Components
- CrowPanel 7" ESP32-S3 HMI Display
- 800×480 RGB touchscreen display
- DHT11 temperature and humidity sensor
- LED alert indicators
- 220Ω resistors
- Jumper wires
- Breadboard for prototyping
Software Tools
- Arduino IDE 2.3.7
- ESP32 Board Package 2.0.15
- LVGL 8.3.11
- LovyanGFX 1.2.19
- GT911 Touch Driver
- Serial Bluetooth Terminal
Project Files
- LVGL_SPI_.ino
- gfx_conf.h
- touch.h
- touch.cpp
- README.md
- LVGL configuration files
Application Discussion
The CrowPanel 7" ESP32-S3 HMI Display is used as the main controller and display interface. It combines an ESP32-S3 microcontroller, RGB display interface, capacitive touchscreen support, and enough processing capability for graphical applications.
CrowPanel 7" ESP32-S3 HMI
The CrowPanel serves as the main control and display interface. It provides a large 800×480 RGB touchscreen for building graphical monitoring dashboards and control panels.
DHT11 Sensor
The DHT11 sensor measures temperature and humidity. The ESP32-S3 reads the sensor data, displays it on the LVGL dashboard, and uses it for alert checking.
LVGL Graphics Library
LVGL creates the touchscreen user interface, including gauges, charts, labels, threshold inputs, and other interactive dashboard widgets.
LovyanGFX
LovyanGFX handles the graphics driver layer for the ESP32-S3 RGB display and connects the display hardware with the LVGL graphics system.
GT911 Touch Driver
The GT911 touch driver enables capacitive touchscreen input so users can adjust alert threshold values and interact with the dashboard.
BLE Communication
BLE communication allows a smartphone app to send commands to the ESP32-S3, such as turning the backlight on or off and starting or stopping sensor data streaming.
Set-up the Hardware
The DHT11 sensor and LED alert indicators are connected externally to the CrowPanel 7" ESP32-S3 HMI Display. The display and touchscreen are already integrated into the CrowPanel module.
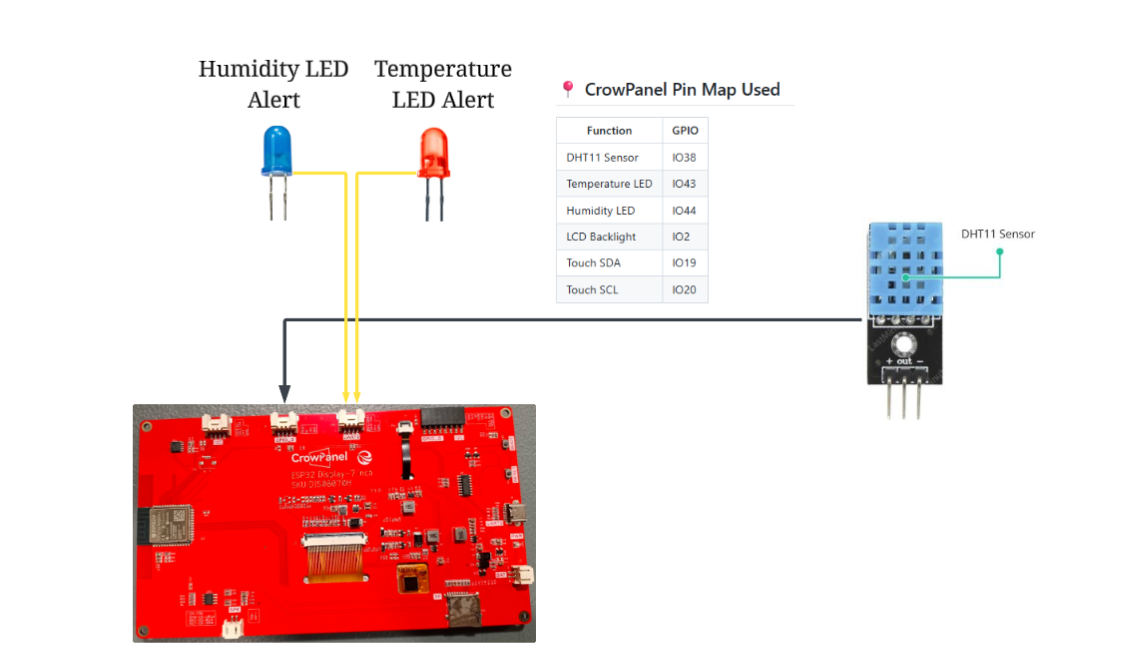
Schematic and hardware connections for the CrowPanel environmental monitoring dashboard.
DHT11 Sensor Connection
CrowPanel Pin Map Used
LED Alert Connections
Temperature Alert LED
- LED anode: IO43 through 220Ω resistor
- LED cathode: GND
- Connection path: IO43 → 220Ω resistor → LED anode → LED cathode → GND
Humidity Alert LED
- LED anode: IO44 through 220Ω resistor
- LED cathode: GND
- Connection path: IO44 → 220Ω resistor → LED anode → LED cathode → GND
Set-up the Software
The repository contains the main Arduino sketch and configuration files needed for the CrowPanel RGB display, capacitive touchscreen, and LVGL dashboard.
Download or Clone the Repository
Download the project repository and use it as the base project because it already includes the required display, touchscreen, and LVGL configuration files.
Install Required Libraries
Install LVGL 8.3.11, LovyanGFX 1.2.19, GT911 Touch Driver, and ESP32 Board Package 2.0.15.
Select the Board
In Arduino IDE, select ESP32S3 Dev Module as the board.
Upload the Project
Open LVGL_SPI_.ino, apply the required board settings, choose the correct port, and upload the project.
Repository Files
Required Libraries
Arduino IDE Settings
These settings are important because the LVGL dashboard and RGB display require enough memory and the correct USB upload configuration.
Code
Here are the working codes.
#define LV_CONF_INCLUDE_SIMPLE

#include <lvgl.h>
#include "gfx_conf.h"
#include "touch.h"
#include "esp_heap_caps.h"
#include <dht.h>

#include <bledevice.h>
#include <bleserver.h>
#include <bleutils.h>
#include <ble2902.h>

extern "C" {
#include <demos>
}

LGFX lcd;

#define BACKLIGHT_PIN 2

/* DHT11 */
#define DHTPIN 38
#define DHTTYPE DHT11

#define TEMP_LED_PIN 43
#define HUM_LED_PIN 44

DHT dht(DHTPIN, DHTTYPE);

/* BLE */
BLECharacteristic *pTxCharacteristic;
bool deviceConnected = false;
bool streamData = false;

#define SERVICE_UUID           "6E400001-B5A3-F393-E0A9-E50E24DCCA9E"
#define CHARACTERISTIC_UUID_RX "6E400002-B5A3-F393-E0A9-E50E24DCCA9E"
#define CHARACTERISTIC_UUID_TX "6E400003-B5A3-F393-E0A9-E50E24DCCA9E"

/* Required by lv_demo_widgets */
float g_temperature = 25.0;
float g_humidity = 60.0;

float temp_alert_threshold = 30.0;
float hum_alert_threshold = 70.0;

/* LVGL draw buffer */
static lv_disp_draw_buf_t draw_buf;
static lv_color_t *buf1;
static lv_color_t *buf2;


/* DISPLAY FLUSH */

void my_disp_flush(lv_disp_drv_t *disp, const lv_area_t *area, lv_color_t *color_p)
{
  uint32_t w = area->x2 - area->x1 + 1;
  uint32_t h = area->y2 - area->y1 + 1;

  lcd.startWrite();
  lcd.setAddrWindow(area->x1, area->y1, w, h);
  lcd.writePixels((lgfx::rgb565_t*)color_p, w * h);
  lcd.endWrite();

  lv_disp_flush_ready(disp);
}


/* TOUCH READ */

void my_touch_read(lv_indev_drv_t *indev_driver, lv_indev_data_t *data)
{
  ts.read();

  if (ts.isTouched)
  {
    data->state = LV_INDEV_STATE_PR;
    data->point.x = ts.points[0].x;
    data->point.y = ts.points[0].y;
  }
  else
  {
    data->state = LV_INDEV_STATE_REL;
  }
}


/* BLE CONNECTION CALLBACK */

class MyServerCallbacks: public BLEServerCallbacks {

  void onConnect(BLEServer* pServer) {
    deviceConnected = true;
  }

  void onDisconnect(BLEServer* pServer) {
    deviceConnected = false;
    streamData = false;
    pServer->getAdvertising()->start();
  }
};


/* BLE COMMAND HANDLER */

class MyCallbacks: public BLECharacteristicCallbacks {

  void onWrite(BLECharacteristic *pCharacteristic)
  {
    String rx = pCharacteristic->getValue().c_str();

    rx.trim();
    rx.toUpperCase();

    if(rx == "ON")
    {
      digitalWrite(BACKLIGHT_PIN, HIGH);
      Serial.println("Screen ON");
    }

    if(rx == "OFF")
    {
      digitalWrite(BACKLIGHT_PIN, LOW);
      Serial.println("Screen OFF");
    }

    if(rx == "READ")
    {
      streamData = true;
      Serial.println("Start streaming sensor data");
    }

    if(rx == "STOP")
    {
      streamData = false;
      Serial.println("Stop streaming sensor data");
    }
  }
};


/* SETUP */

void setup()
{
  Serial.begin(115200);

  lcd.begin();

  pinMode(BACKLIGHT_PIN, OUTPUT);
  digitalWrite(BACKLIGHT_PIN, HIGH);

  pinMode(TEMP_LED_PIN, OUTPUT);
  pinMode(HUM_LED_PIN, OUTPUT);

  digitalWrite(TEMP_LED_PIN, LOW);
  digitalWrite(HUM_LED_PIN, LOW);

  lv_init();

  touch_init();

  dht.begin();

  /* BLE INIT */

  BLEDevice::init("CrowPanel-HMI");

  BLEServer *pServer = BLEDevice::createServer();
  pServer->setCallbacks(new MyServerCallbacks());

  BLEService *pService = pServer->createService(SERVICE_UUID);

  BLECharacteristic *pRxCharacteristic = pService->createCharacteristic(
                      CHARACTERISTIC_UUID_RX,
                      BLECharacteristic::PROPERTY_WRITE
                    );

  pRxCharacteristic->setCallbacks(new MyCallbacks());

  pTxCharacteristic = pService->createCharacteristic(
                      CHARACTERISTIC_UUID_TX,
                      BLECharacteristic::PROPERTY_NOTIFY
                    );

  pTxCharacteristic->addDescriptor(new BLE2902());

  pService->start();

  BLEAdvertising *pAdvertising = BLEDevice::getAdvertising();
  pAdvertising->start();

  Serial.println("BLE Ready");

  /* LVGL BUFFER */

  buf1 = (lv_color_t *)heap_caps_malloc(sizeof(lv_color_t) * 800 * 80, MALLOC_CAP_SPIRAM);
  buf2 = (lv_color_t *)heap_caps_malloc(sizeof(lv_color_t) * 800 * 80, MALLOC_CAP_SPIRAM);

  if (!buf1 || !buf2)
  {
    Serial.println("PSRAM buffer allocation failed!");
    while(1);
  }

  lv_disp_draw_buf_init(&draw_buf, buf1, buf2, 800 * 80);

  static lv_disp_drv_t disp_drv;
  lv_disp_drv_init(&disp_drv);

  disp_drv.hor_res = 800;
  disp_drv.ver_res = 480;
  disp_drv.flush_cb = my_disp_flush;
  disp_drv.draw_buf = &draw_buf;

  lv_disp_drv_register(&disp_drv);

  static lv_indev_drv_t indev_drv;
  lv_indev_drv_init(&indev_drv);

  indev_drv.type = LV_INDEV_TYPE_POINTER;
  indev_drv.read_cb = my_touch_read;

  lv_indev_drv_register(&indev_drv);

  lv_demo_widgets();
}


/* LOOP */

void loop()
{
  static unsigned long lastRead = 0;

  if (millis() - lastRead > 2000)
  {
    lastRead = millis();

    float t = dht.readTemperature();
    float h = dht.readHumidity();

    if (!isnan(t) && !isnan(h))
    {
      g_temperature = t;
      g_humidity = h;

      /* TEMPERATURE ALERT LED */

      if(g_temperature >= temp_alert_threshold)
        digitalWrite(TEMP_LED_PIN, HIGH);
      else
        digitalWrite(TEMP_LED_PIN, LOW);

      /* HUMIDITY ALERT LED */

      if(g_humidity >= hum_alert_threshold)
        digitalWrite(HUM_LED_PIN, HIGH);
      else
        digitalWrite(HUM_LED_PIN, LOW);

      /* BLE STREAM */

      if(deviceConnected && streamData)
      {
        char msg[64];

        sprintf(msg,"TEMP: %.1f C\nHUM: %.1f %%\n",
                g_temperature,
                g_humidity);

        pTxCharacteristic->setValue((uint8_t*)msg, strlen(msg));
        pTxCharacteristic->notify();
      }
    }
  }

  lv_timer_handler();
  lv_tick_inc(5);
  delay(5);
}
#pragma once

#include <lovyangfx.hpp>
#include <lgfx>
#include <lgfx>

class LGFX : public lgfx::LGFX_Device
{
  lgfx::Bus_RGB _bus;
  lgfx::Panel_RGB _panel;

public:

  LGFX(void)
  {
    {
      auto cfg = _bus.config();

      cfg.panel = &_panel;

      cfg.pin_d0  = 15;
      cfg.pin_d1  = 7;
      cfg.pin_d2  = 6;
      cfg.pin_d3  = 5;
      cfg.pin_d4  = 4;

      cfg.pin_d5  = 9;
      cfg.pin_d6  = 46;
      cfg.pin_d7  = 3;
      cfg.pin_d8  = 8;
      cfg.pin_d9  = 16;
      cfg.pin_d10 = 1;

      cfg.pin_d11 = 14;
      cfg.pin_d12 = 21;
      cfg.pin_d13 = 47;
      cfg.pin_d14 = 48;
      cfg.pin_d15 = 45;

      cfg.pin_henable = 41;
      cfg.pin_vsync   = 40;
      cfg.pin_hsync   = 39;
      cfg.pin_pclk    = 0;

      cfg.freq_write = 12000000;

      cfg.hsync_polarity    = 0;
      cfg.hsync_front_porch = 40;
      cfg.hsync_pulse_width = 48;
      cfg.hsync_back_porch  = 40;

      cfg.vsync_polarity    = 0;
      cfg.vsync_front_porch = 1;
      cfg.vsync_pulse_width = 31;
      cfg.vsync_back_porch  = 13;

      cfg.pclk_active_neg = 1;

      _bus.config(cfg);
    }

    {
      auto cfg = _panel.config();

      cfg.memory_width  = 800;
      cfg.memory_height = 480;
      cfg.panel_width   = 800;
      cfg.panel_height  = 480;

      cfg.offset_x = 0;
      cfg.offset_y = 0;

      _panel.config(cfg);
    }

    _panel.setBus(&_bus);
    setPanel(&_panel);
  }
};
#include "touch.h"

TAMC_GT911 ts = TAMC_GT911(TOUCH_SDA, TOUCH_SCL, TOUCH_INT, TOUCH_RST, 800, 480);

void touch_init()
{
   Wire.begin(TOUCH_SDA, TOUCH_SCL, 100000);

    ts.begin();
    ts.setRotation(1);   // try 0–3 if touch direction is wrong
}
#pragma once

#include <wire.h>
#include <tamc_gt911.h>

#define TOUCH_SDA 19
#define TOUCH_SCL 20
#define TOUCH_INT 38
#define TOUCH_RST -1   // important

extern TAMC_GT911 ts;

void touch_init();
Code Components and Functions
The software initializes the display, touchscreen, LVGL dashboard, DHT11 sensor reading, BLE communication, alert logic, and LVGL memory buffer.
Display Initialization
Initializes the CrowPanel 7" RGB screen and prepares it for LVGL rendering using LovyanGFX.
Touchscreen Initialization
Initializes the GT911 capacitive touch controller and connects touch input to LVGL.
LVGL Dashboard Interface
Displays temperature gauges, humidity gauges, trend charts, threshold inputs, and BLE streaming status.
DHT11 Sensor Reading
Reads temperature and humidity data from the DHT11 sensor connected to IO38.
BLE Communication
Allows the ESP32-S3 to receive commands and stream sensor values using the BLE name CrowPanel-HMI.
Alert Logic
Compares the current readings with threshold values and turns on the temperature or humidity LED alerts.
Working path used: C:\Users\YourUser\Documents\Arduino\libraries\lvgl\src\demos\widgets
Supported BLE Commands
Alert Threshold Examples
TEMP: 27.5 C
HUM: 65.0 %
Temperature alert logic: If temperature >= temperature threshold, temperature LED turns ON.
Humidity alert logic: If humidity >= humidity threshold, humidity LED turns ON.
LVGL memory optimization: RGB displays require larger display buffers. In this project, the LVGL display buffers are allocated in PSRAM to improve stability and performance. The example buffer size used is 800 × 80.
Testing Video
The testing video can be added to the tutorial as a reference for the working dashboard demonstration.
Conclusion
This project demonstrates how to build a smart environmental monitoring dashboard using the CrowPanel 7" ESP32-S3 HMI Display, DHT11 sensor, LVGL, LovyanGFX, and BLE communication. The system displays temperature and humidity values through an interactive touchscreen dashboard with real-time charts, configurable alert thresholds, BLE command control, and LED-based hardware alerts.
Related Projects and Improvements
This project can be improved by adding WiFi MQTT sensor publishing, SD card data logging, Home Assistant integration, LVGL popup alerts, OTA firmware updates, additional sensors, cloud dashboard integration, and multi-room environmental monitoring.
References
These are the websites and documentation sources used as references. They are listed as names or plain website addresses only, without active external links.


