

Overview:
Internet of Things (IoT) is an interrelated system of machines and objects things that can transfer data over a network without any interaction involved. It consists of web-enabled smart devices using embedded systems like sensors, and communication devices to collect and send data. These data are sent online to be accessed by end users. This project will teach you how to create your very own IoT device using a load cell to collect weight data The project consists of building a digital weighing scale, and connecting it with an online IoT Dashboard to display the real-time measurements.
Hardware and Software Components:
Hardware:
Software:
Online Platform:
Application Discussion:
Hardware:
- YZC-516 Load Cell/ Strain Gauge (100kg)

- Caters load with max capacity of 100 kg
- Input and Output resistance of 365 ± 5 ohm and 350 ± 3ohm respectively for effective force measurement
- A combined error (%RO) of < ± 0.05 for on-point accuracy
- Can work on a -35 °C - 80 °C environment
- Having a C2 accuracy class intended for industrial use
- Sensor works on a 10V - 15V Excitation Voltage


- HX711 Load Cell Amplifier

- Operating voltage of 2.5V - 5V which can be powered by Arduino
- Uses a 24 bit Analog-to-Digital converter chip for accurate output
- A module which converts analog data from the sensor to digital output
- Refresh frequency of 80 Hz for fast load sensor data acquisition
- Widely used in industrial, aerospace, medicine, and other fields which requires force, pressure, displacement, strain, torque, and acceleration measurements
What are Analog to Digital Converters (ADCs)?
These converters are integrated circuits that converts signals directly form continuous form to discrete form. The main features of ADCs are sample rate (the speed to convert signal from analog to digital), and the bit resolution (the accuracy of the conversion).

ADC needs a clock to operate. The time taken to convert the analog to digital value depends on the clock source. It then samples the analog signal on each falling or rising edge of the sample clock. In each cycle, the ADC gets the analog signal, measures it, and converts it into a digital value.

- Arduino Uno R3 CH340 (Arduino-compatible)

- The Arduino-Compatible UNO R3 CH340 board differs from the official Arduino UNO R3 board is that it does not use the expensive FTDI USB-to-serial driver chip.
- Instead, it features the CH340 USB-to-serial converter chip which makes it low cost and 100% Arduino UNO R3 compatible board.
- W5100 Ethernet Shield

- Connects the Arduino to the internet
- Can be mounted to Arduino using long wire-wrap headers which extend through the shield. The shield can keep the pin-layouts intact and also allow another shield to be stacked above.
- Has a standard RJ-45 connection, with an integrated line transformer and Power over Ethernet enabled.
- The shield provides a standard RJ45 ethernet jack.
Online Platform:
- Cayenne IoT

- Cayenne is the world’s first drag and drop IoT project builder that empowers developers, designers and engineers to quickly prototype and share their connected device projects
- Cayenne was designed to help users create Internet of Things prototypes and then bring them to production
- Cayenne is a product from myDevices that allows you to not only display data but also set up triggers, monitor devices, control devices, etc.
- The Cayenne MQTT API is used to connect any device that you have with the Cayenne Cloud

Hardware Set-up:
Schematic Diagram:


- HX711 Load Cell Amplifier Module
-
Arduino Connection
- VCC is connected to Arduino 5V pin
- GND is connected to Arduino GND pin
- DT (Data) is connected to Arduino pin 4
- SCK(Clock) is connected to Arduino pin 5
- Load Cell Connection
- E+ connected to load cell + Excitation (red) wire
- E- connected to load cell - Excitation (black) wire
- A- connected to load cell - Signal (white) wire
- A+ connected to load cell + Signal (green) wire

-
100kg Load Cell
- + Excitation (red) wire connected to HX711 module E+ pin
- - Excitation (black) wire connected to HX711 module E- pin
- - Signal (white) wire connected to HX711 module A- pin
- + Signal (green) wire connected to HX711 module A+ pin
- Shield (metal) wire connected to Arduino GND pin

-
W5100 Arduino Ethernet Shield
- Mounted above the Arduino pins
- Ethernet Cable connected to Router Port/Computer Port
Software Set-up:
Before setting up the Arduino code, the ethernet shield must be connected to the internet through direct connection via router. It can also connect via Wi-fi through the computer ethernet port.
Wi-fi Connection:
- On the control panel, click the Wi-fi connection

- Click properties
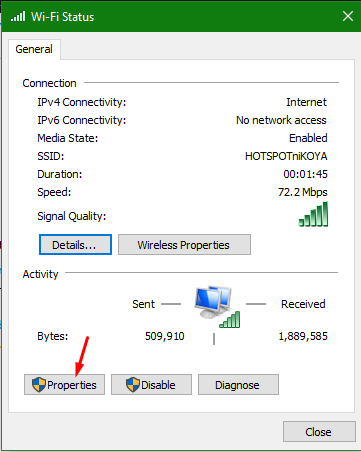
- Click allow
- Set home networking connection to Ethernet

- An ethernet connection is established and will serve as the internet connection of the Arduino.

We can also test if an internet connection is established by using the existing example sketches in Arduino.
Ethernet Connection Test:
- Run the DhcpAddressPrinter sketch example

- This sketch will display the IP address if connected

After connecting to the internet, the Arduino must be interfaced with the Cayenne Dashboard.
Cayenne Dashboard Setup + Connection:
- After account registration, add a new device to be connected to the dashboard

- Choose Arduino at the Microcontrollers section

- Connect the Arduino with Ethernet Shield to the computer, and install the Cayenne Library to the Arduino IDE before clicking next

- Choose the W5100 Ethernet Shield in the Arduino Uno section and click Sketch

- A code will be given to be used on the IDE

- The following details are needed to establish the Cayenne connection

- Run the sketch, and wait until the Arduino is connected to the dashboard


- The Arduino/Ethernet Shield is finally connected to the dashboard

After setting-up the Cayenne Dashboard, we now move on to the Load Cell. Before interfacing the sensor to the dashboard, a calibration must be executed to correct the sensor's projected values. The Arduino IDE have examples for this matter.
Load Cell Calibration:
- Run the Calibration sketch example
- The sketch is located inside the HX711_ADC section since the module converts the analog values from the sensor to digital values.

- On the serial monitor, enter t
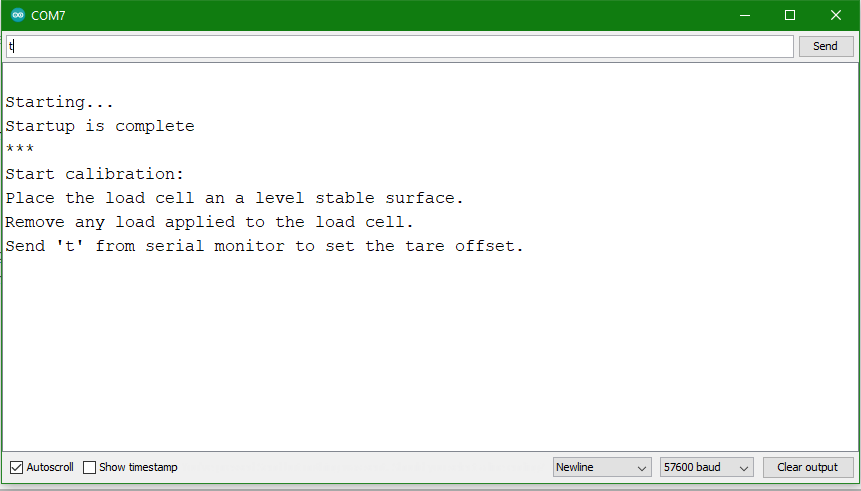
- Now place a measured load, and enter the weight to start the calibration to get the calibration value

- The calibration value is generated which will be used later
- The value can also be saved to the EEPROM address for ESP microcontrollers
- Enter n to not save value

- The monitor will display the current load cell output value based on the calibration value

Before interfacing the load cell to the dashboard, we can test it's efficiency with the code provided below. The code is based on an existing example in the IDE for HX711, tailored specifically for this project.

Code (Load Cell Testing):
#include <HX711_ADC.h>

//input pins
const int HX711_dout = 4; //mcu > HX711 dout pin
const int HX711_sck = 5; //mcu > HX711 sck pin

//HX711 constructor:
HX711_ADC LoadCell(HX711_dout, HX711_sck);

unsigned long t = 0;

float i;

void setup() {
  Serial.begin(57600); delay(10);

  Serial.println();
  Serial.println("Starting...");

  LoadCell.begin();

  //LoadCell.setReverseOutput(); //uncomment to turn a negative output value to positive

  //load cell calibration value
  float calibrationValue;
  calibrationValue = -39.52; //set calibration value according to the result in calibration sketch

  unsigned long stabilizingtime = 5000; // preciscion right after power-up can be improved by adding a few seconds of stabilizing time

  boolean _tare = true; //set this to false if you don't want tare to be performed in the next step

  LoadCell.start(stabilizingtime, _tare);

  if (LoadCell.getTareTimeoutFlag()) {
    Serial.println("Timeout, check MCU>HX711 wiring and pin designations");
    while (1);
  }
  else {
    LoadCell.setCalFactor(calibrationValue); // set calibration value (float)
    Serial.println("Startup is complete");
  }
}

void loop() {
  //load cell data status
  static boolean newDataReady = 0;

  //serial print interval
  const int serialPrintInterval = 2000; //increase to slow activity

  // check for new data/start next conversion:
  if (LoadCell.update()) newDataReady = true;

  // get smoothed value from the dataset:
  if (newDataReady) {

    //start printing data
    if (millis() > t + serialPrintInterval) {

      //get rounded load cell data
      i = round(LoadCell.getData());

      //set value to 0 if the output is less than or equal to 1
      if(i<=1){
        i=0;
      }

      //print value in grams
      Serial.print("Load_cell output val: ");
      Serial.print(i);
      Serial.println(" grams");

      //reset load cell data
      newDataReady = 0;

      //set t to milliseconds
      t = millis();
    }
  }
}
Code Breakdown:
Libraries:
- HX711_ADC.h
-
The library for the HX711 module to read load sensor data
- Can be downloaded with Arduino's Library Manager or on the website
Variables:
- HX711_ADC LoadCell(HX711_dout, HX711_sck)
- The object for the HX711 module along with the pin variables
- float calibrationValue
- The variable for the sensor calibration value from the "Calibration" sketch
- float i
- The variable for the sensor data value
- unsigned long stabilizing time
- The time allotted to stabilize the sensor before requesting output value
- boolean _tare
- Tare (weight measurement) operation status
Functions:
- LoadCell.start()
- Starts the module according to stabilizing time and tare status
- LoadCell.getTareTimeoutFlag()
- Checks for loose connection with the module
- LoadCell.setCalFactor(calibrationValue)
- Sets the calibration value to produce accurate results during weight operation
- LoadCell.update()
- Updates current sensor data to new value
- LoadCell.getData()
- Gets updated sensor output value to display
After testing the sensor, we can now interface it with the dashboard to send values online. The code is the same above, but with cayenne's generic analog sensor code added from the example in the IDE.

Code (Load Cell with Cayenne Dashboard):
#include <HX711_ADC.h>

#include <CayenneMQTTEthernet.h>
#define CAYENNE_PRINT Serial  // Comment this out to disable prints and save space

// Cayenne authentication info. This should be obtained from the Cayenne Dashboard.
char username[] = "439049b0-0660-11ed-8df2-dd50487e509b";
char password[] = "1f5cf9c47e9fc2b28eaa1ffb054b62003a71127a";
char clientID[] = "890c8f30-07ff-11ed-8df2-dd50487e509b";

#define VIRTUAL_CHANNEL 1

//pins:
const int HX711_dout = 4; //mcu > HX711 dout pin
const int HX711_sck = 5; //mcu > HX711 sck pin

//HX711 constructor:
HX711_ADC LoadCell(HX711_dout, HX711_sck);

unsigned long t = 0;

float i;
float weight;

void setup()
{
  Serial.begin(57600); delay(10);

  Serial.println("Starting...");

  Cayenne.begin(username, password, clientID);

  LoadCell.begin();

  //load cell calibration value
  float calibrationValue;
  calibrationValue = -39.52; //set calibration value according to the result in calibration sketch

  //load cell stabilization
  unsigned long stabilizingtime = 5000; // preciscion right after power-up can be improved by adding a few seconds of stabilizing time

  //tare (weighing) status
  boolean _tare = true; //set this to false if you don't want tare to be performed in the next step

  //start load cell with the stabilizing time and tare status
  LoadCell.start(stabilizingtime, _tare);

  //check connection
  if (LoadCell.getTareTimeoutFlag()) {
    Serial.println("Timeout, check MCU>HX711 wiring and pin designations");
    while (1);
  }
  else {
    LoadCell.setCalFactor(calibrationValue); // set calibration value (float)
    Serial.println("Startup is complete");
  }
}

void loop()
{
  //load cell data status
  static boolean newDataReady = 0;

  // check for new data/start next conversion:
  if (LoadCell.update()) newDataReady = true;

  // get smoothed value from the dataset:
  if (newDataReady) {

     //get rounded load cell data
     i = round(LoadCell.getData());

     //set value to 0 if the output is less than or equal to 1
     if(i<=1){
       i=0;
     }

     //convert output from grams to kg
     weight = i/1000;

     //call the function
     Cayenne.loop();

     //reset load cell data
     newDataReady = 0;
  }
}

// This function is called at intervals to send sensor data to Cayenne.
CAYENNE_OUT(VIRTUAL_CHANNEL)
{
  //display output value to cayenne dashboard
  Cayenne.virtualWrite(VIRTUAL_CHANNEL, weight);

  //print to serial monitor
  Serial.print("Load_cell output val: ");
  Serial.print(weight,3);
  Serial.println(" kg");
}
Code Breakdown:
Libraries:- HX711_ADC.h
- The library for the HX711 module to read load sensor data
- Can be downloaded with Arduino's Library Manager or on the website
- CayenneMQTTEthernet.h
- The library for Cayenne Dashboard connection to display sensor data online
- Can be downloaded with Arduino's Library Manager or on the website
@HX711
- HX711_ADC LoadCell(HX711_dout, HX711_sck)
- The object for the HX711 module along with the pin variables
- float calibrationValue
- The variable for the sensor calibration value from the "Calibration" sketch
- float i
- The variable for the sensor data value
- unsigned long stabilizing time
- The time allotted to stabilize the sensor before requesting output value
- boolean _tare
- Tare (weight measurement) operation status
- #define CAYENNE_PRINT Serial
- Enables Cayenne Serial Print
- #define VIRTUAL_CHANNEL 1
- Virtual Dashboard Channel to display sensor data
- char username[]
- Device's Cayenne username (provided in the Cayenne link code)
- char password[]
- Device's Cayenne password (provided in the Cayenne link code)
- char clientID[]
- Device's Cayenne client ID (provided in the Cayenne link code)
- float weight
- Converted sensor value from grams to kg
@HX711
- LoadCell.start()
- Starts the module according to stabilizing time and tare status
- LoadCell.getTareTimeoutFlag()
- Checks for loose connection with the module
- LoadCell.setCalFactor(calibrationValue)
- Sets the calibration value to produce accurate results during weight operation
- LoadCell.update()
- Updates current sensor data to new value
- LoadCell.getData()
- Gets updated sensor output value to display
- Cayenne.begin(username, password, clientID)
- Starts cayenne connection
- Displays connection status in serial monitor
- Cayenne.loop()
- Calls the CAYENNE_OUT(VIRTUAL_CHANNEL) class
- Cayenne.virtualWrite(VIRTUAL_CHANNEL, weight)
- Uploads the sensor output value to the dashboard's virtual channel
Video Demo:
Conclusion:
Interfacing a load sensor to an online platform provides more access to data with the help of the internet. Accessibility is one of the advantages of IoT thus making it significantly valuable in our modern society.
References:
- https://store.fut-electronics.com/products/load-cell-1ton
- https://en.wikipedia.org/wiki/Load_cell
- https://www.botnroll.com/en/flex-pressure-vibration/2980-hx711-dual-channel-weighing-sensor-module.html
- https://www.elprocus.com/analog-to-digital-converter/
- https://docs.arduino.cc/retired/shields/arduino-ethernet-shield-without-poe-module
- https://artofcircuits.com/product/uno-r3-ch340-board-with-usb-cable
- https://developers.mydevices.com/cayenne/docs/cayenne-mqtt-api/
- https://www.opc-router.com/what-is-mqtt/


