

Overview
Here’s an interesting scenario. You bought something across the internet. In the midst of the waiting, you ponder “How do they track the packages?”
Usually, an online shipping company has a fleet of magicians that delivers your parcel/package. Along the way, they fight different monsters across dimensions trying to steal your package. (This is the reason the package takes too long to arrive  ) At Headquarters, they have a magic crystal ball that reveals the current location of the magicians.
I’m sorry to burst your bubble, but modern technology isn’t magic. Shipping companies employ positioning systems (GLONASS or GPS) to fetch the longitude and latitude of the object being tracked.
According to Garmin, The Global Positioning System (GPS) is a satellite-based navigation system made up of at least 24 satellites. GPS works in any weather conditions, anywhere in the world, 24 hours a day, with no subscription fees or setup charges. The U.S. Department of Defense (USDOD) originally put the satellites into orbit for military use, but they were made available for civilian use in the 1980s.
Hardware Used
Software Used
- Arduino IDE
- Notepad/Notepad++
Libraries Used
Application Description
Ready your Notepad !We’ll save some relevant APIs, Keys, and Links in the notepad for quick reference.
First things first, we need a map to mark our locations. Luckily, Google Maps offer these services.
Google Maps API
0. If you do not have a google account, please register here.
1.Sign in and Go to https://console.developers.google.com/cloud-resource-manager, and Create a New Project.
![]()
2. Fill in your desired relevant Project Name.

3. Open your Project by Clicking the Project Name.
4. In the Search Bar, Type in “Google Maps Javascript API”.

5. When the redirected website has fully loaded, Click the button “Enable”

6. After Clicking “Enable” Button, it will redirect you to an overview of the project. For now, we will just need to retrieve the Google Maps Javascript API. Simply click the “Credentials” tab.

7. Click “Create Credentials”, and Select “API Key”.

8. Copy-Paste the generated API in the handy-dandy notepad. We’ll use this in our HTML code to view the location in Google Maps.

Thingspeak
ThingSpeak is an open source Internet of Things (IoT) application and API to store and retrieve data from things using the HTTP protocol over the Internet or via a Local Area Network. ThingSpeak enables the creation of sensor logging applications, location tracking applications, and a social network of things with status updates.
- Create an Account, if you do not have one yet.
- Create a new Channel.
- Fill-up the blank fields. Name “Field 1” and “Field 2” as “Longitude” and “Latitude”, respectively.
- Save the Channel.
- In the overview, Click the “API Keys” tab.
- Note/Save the Channel ID, and READ API Keys. These will be used in the Arduino Code.


GPRS
General Packet Radio Services (GPRS) is a packet-based wireless communication service that promises data rates from 56 up to 114 Kbps and continuous connection to the Internet for mobile phone and computer users. The higher data rates allow users to take part in video conferences and interact with multimedia Web sites and similar applications using mobile handheld devices as well as notebook computers. GPRS is based on Global System for Mobile (GSM) communication and complements existing services such circuit-switched cellular phone connections and the Short Message Service (SMS).
The SIM800C Module offers the ability to send messages, calls, and internet connectivity. It is a handy module to set-up IoT on the field.
GPRS setup is pretty straightforward. You just need to know what’s you Access Point Name (APN), and a username and password, if authentication is required.
GPS
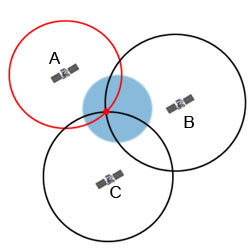
According to physics.org, If you know how far away you are from satellite A, then you know you must be located somewhere on the red circle. If you do the same for satellites B and C, you can work out your location by seeing where the three circles intersect. This is just what your GPS receiver does, although it uses overlapping spheres rather than circles.The more satellites there are above the horizon the more accurately your GPS unit can determine where you are.
Set-up the Hardware

Code
Arduino Code
Serial Monitor is left on the code for debugging purposes. They can be removed in the final output to save memory.
Replace the Access Point Name (APN), and READ KEY API with yours.
/**************************************************************
 *
 * This sketch connects to a website and downloads a page.
 * It can be used to perform HTTP/RESTful API calls.
 *
 * TinyGSM Getting Started guide:
 *   http://tiny.cc/tiny-gsm-readme
 *
 **************************************************************/

// Select your modem:
#define TINY_GSM_MODEM_SIM800
// #define TINY_GSM_MODEM_SIM808
// #define TINY_GSM_MODEM_SIM900
// #define TINY_GSM_MODEM_A6
// #define TINY_GSM_MODEM_A7
// #define TINY_GSM_MODEM_M590
// #define TINY_GSM_MODEM_ESP8266

// Increase RX buffer if needed
//#define TINY_GSM_RX_BUFFER 512

#include <TinyGsmClient.h>
#include <TinyGPS.h>
#include <SoftwareSerial.h>
// Uncomment this if you want to see all AT commands
//#define DUMP_AT_COMMANDS

// Uncomment this if you want to use SSL
//#define USE_SSL

// Set serial for debug console (to the Serial Monitor, default speed 115200)
#define SerialMon Serial

// Use Hardware Serial on Mega, Leonardo, Micro
#define SerialAT Serial1

TinyGPS gps;
SoftwareSerial SerialAT(2, 3); // RX, TX
SoftwareSerial ss(6, 7);

// Your GPRS credentials
// Leave empty, if missing user or pass
const char apn[]  = "NETWORK APN HERE";
const char user[] = "";
const char pass[] = "";

// Server details
const char server[] = "api.thingspeak.com";
const char resource[] = "https://api.thingspeak.com/update?api_key=YOUR_READ_KEYI_HERE&field1=%s&field2=%s";
//buffers
char buffer[100];
char latbuffer[20];
char lonbuffer[20];

#ifdef DUMP_AT_COMMANDS
  #include <StreamDebugger.h>
  StreamDebugger debugger(SerialAT, SerialMon);
  TinyGsm modem(debugger);
#else
  TinyGsm modem(SerialAT);
#endif

#ifdef USE_SSL
  TinyGsmClientSecure client(modem);
  const int  port = 443;
#else
  TinyGsmClient client(modem);
  const int  port = 80;
#endif

float flat, flon;
unsigned long age;

void setup() {
  // Set console baud rate (
  SerialMon.begin(115200);
  delay(10);

  // Set GSM module baud rate
  SerialAT.begin(57600);
  delay(2000);

  // Set GPS module baud rate
  ss.begin(9600);
  delay(2000);

  SerialMon.println(F("Initializing modem..."));
  modem.restart();
  // Unlock your SIM card with a PIN
  //modem.simUnlock("1234");
}

void loop() {

  bool newData = false;
  unsigned long chars;
  unsigned short sentences, failed;

  ss.listen();
  // For one second we parse GPS data and report some key values
  for (unsigned long start = millis(); millis() - start < 1000;)
  {
    while (ss.available())
    {
      char c = ss.read();
      //Serial.write(c); // uncomment this line if you want to see the GPS data flowing
      if (gps.encode(c)) // Did a new valid sentence come in?
        newData = true;
    }
  }

  if (newData)
  {
    SerialAT.listen();
    gps.f_get_position(&flat, &flon, &age);
    SerialMon.print("LAT=");
    SerialMon.print(flat == TinyGPS::GPS_INVALID_F_ANGLE ? 0.0 : flat, 6);
    SerialMon.print(" LON=");
    SerialMon.print(flon == TinyGPS::GPS_INVALID_F_ANGLE ? 0.0 : flon, 6);
    delay(10);

    //_______
    SerialMon.print(F("Waiting for network..."));
    if (!modem.waitForNetwork()) {
      SerialMon.println(" fail...");
      delay(5000);
      return;
    }

    SerialMon.println(" OK");

    SerialMon.print(F("Connecting to "));
    SerialMon.print(apn);

    if (!modem.gprsConnect(apn, user, pass)) {
      SerialMon.println(" fail...");
      delay(5000);
      return;
    }
    SerialMon.println(" OK");

    SerialMon.print(F("Connecting to "));
    SerialMon.print(server);
    if (!client.connect(server, port)) {
      SerialMon.println(" fail");
      delay(5000);
    }

    SerialMon.println(" OK");


    sprintf(buffer, resource,dtostrf(flat, 6,4,latbuffer),  dtostrf(flon ,6,4,lonbuffer) );
    // Make a HTTP GET request:
    client.print(String("GET ") + buffer + " HTTP/1.0\r\n");
    client.print(String("Host: ") + server + "\r\n");
    client.print("Connection: close\r\n\r\n");


    unsigned long timeout = millis();

    // Shutdown

    client.stop();
    SerialMon.println(F("Server disconnected"));
  //_______

    }
    gps.stats(&chars, &sentences, &failed);
      SerialMon.print(" CHARS=");
      SerialMon.print(chars);
      SerialMon.print(" SENTENCES=");
      SerialMon.print(sentences);
      SerialMon.print(" CSUM ERR=");
      SerialMon.println(failed);
    if (chars == 0){
      SerialMon.println("** No characters received from GPS: check wiring **");
    }

    delay(5000);
}
HTML Code
We will neede a bit of HTML to view the GPS location in Google Maps.
Copy to Notepad, Replace GOOGLE MAPS API, CHANNEL ID, and READ API KEYs.Afterwards, save the file as Index.html (Or anyname.html).
<!DOCTYPE html>
<html>
  <head>
    <title>GPS Tracking System</title>
    <meta name="viewport" content="initial-scale=1.0, user-scalable=no">
    <meta charset="utf-8">
    <style>
      /* Always set the map height explicitly to define the size of the div
       * element that contains the map. */
      #map {
        height: 100%;
      }
      /* Optional: Makes the sample page fill the window. */
      html, body {
        height: 100%;
        margin: 0;
        padding: 0;
      }
    </style>
    <script src="https://maps.googleapis.com/maps/api/js?key=YOUR_GOOGLE_MAPS_API_HERE"></script>
    <script src="https://ajax.googleapis.com/ajax/libs/jquery/3.1.1/jquery.min.js"></script>
    <script>

      var map;
        var x;
        function loadmaps(){
            $.getJSON("https://api.thingspeak.com/channels/CHANNEL_ID/fields/1/last.json?api_key=YOUR_READ_API_KEY", function(result){

            var m = result;
            x=Number(m.field1);
                           //alert(x);

        });
            $.getJSON("https://api.thingspeak.com/channels/CHANNEL_ID/fields/2/last.json?api_key=YOUR_READ_API_KEY", function(result){

            var m = result;
            y=Number(m.field2);


        }).done(function() {

                initialize();
    });

        }
                window.setInterval(function(){
        loadmaps();
            }, 9000);
      function initialize() {
          //alert(y);
        var mapOptions = {
          zoom: 18,
          center: {lat: x, lng: y}
        };
        map = new google.maps.Map(document.getElementById('map'),
            mapOptions);

        var marker = new google.maps.Marker({
          position: {lat: x, lng: y},
          map: map
        });

        var infowindow = new google.maps.InfoWindow({
          content: '<p>Marker Location:' + marker.getPosition() + '</p>'
        });

        google.maps.event.addListener(marker, 'click', function() {
          infowindow.open(map, marker);
        });
      }

      google.maps.event.addDomListener(window, 'load', initialize);
    </script>
  </head>
  <body>
    <div id="map"></div>
  </body>
</html>
Code Breakdown
const char apn[] = "NETWORK APN HERE";
const char user[] = "";
const char pass[] = "";
These constant variables will be used for the GSM module to connect to the internet. Replace the placeholders with the correct information.
char buffer[100];
char latbuffer[20];
char lonbuffer[20];
As the name implies, these are char buffers to store float (latitude and longitude). Arduino does not support ‘%f‘ in sprintf function.
for (unsigned long start = millis(); millis() - start < 1000;) {
   while (ss.available()) {
   char c = ss.read();
   //Serial.write(c);
   // uncomment this line if you want to see the GPS data flowing
   if (gps.encode(c)) // Did a new valid sentence come in?
   newData = true;
  }
}
The For loop is simply a timer block. When a second passes, it checks for the latitude and longitude of the GPS.
sprintf(buffer, resource ,dtostrf(flat, 6,4,latbuffer), dtostrf(flon ,6,4,lonbuffer) );
Simply substitutes the %s in the resource variable (“https://api.thingspeak.com/update?api_key=YOUR_READ_KEYI_HERE&field1=%s&field2=%s) .
We need to convert the float (latitude and longitude) variables to char so that it can be substituted to the resource variable.The parameters for dtostrf() are :
dtostrf(floatVar, minStringWidthIncDecimalPoint, numVarsAfterDecimal, charBuf);
Conclusion
Integrating different modules can be rewarding, and satisfying. It enables the creative enthusiasts to reach greater functionality, and broadens the horizon for innovation. The GPS alone is a formidable device. When integrated with internet connectivity, it can be used for numerous applications : Navigation(such as Road navigations), and Tracking (such as Wildlife).
References
https://github.com/iobridge/thingspeak/blob/master/
http://www.physics.org/article-questions.asp?id=55
http://iotmonk.com/lessons/programming-esp12e-nodemcu-module-upload-gps-data-thingspeak/
The post GPS (UBLOX NEO-6M) Tracking System with GSM (SIM800C) data connectivity and Google Maps Integration appeared first on CreateLabz.


