Overview
This mini-project covers the functionality of a DHT11 humidity and temperature sensor module. It is an accurate and inexpensive sensor that has an ADC to convert analog values of humidity and temperature. The 8-bit microcontroller in the sensor is used for data conversion. It provides reliable output results when the ambient humidity in the range from 20% RH to 90% RH, and a temperature range of 0 ° C to 50 ° C. It is good for most home and everyday applications. The expected data outputs can be seen on the serial monitor of the Arduino and the LCD so that you can compare the two.
Hardware Components
You can buy all this Hardware at Createlabz.
Software Components
Application Discussion
How does a DHT11 work?
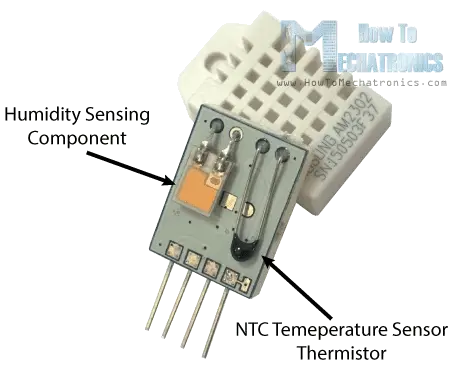
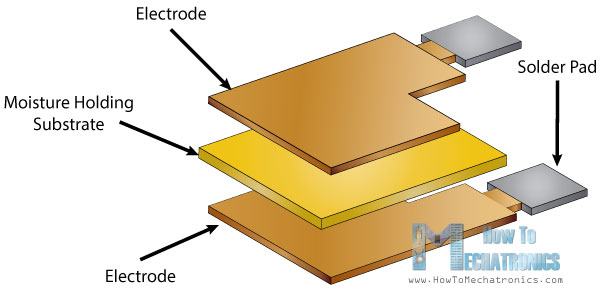
It consists of a Humidity Sensing Component, an NTC Temperature Sensor or Thermistor, and an IC on the back side of the sensor. To measure the humidity, two electrodes with a moisture holding substrate determine the humidity. As the humidity changes, the conductivity of the substrate changes or the resistance between these electrodes changes. This change in resistance is measured and processed by the IC which makes it ready to be read by a microcontroller.


For the temperature sensing aspect, it is determined by an NTC Temperature Sensor or a Thermistor. A thermistor is a variable resistor that changes its resistance as the temperature changes. The term NTC means Negative Temperature Coefficient, which means that the resistance decreases with the increase of temperature. [1]
Technical Details (DHT11)
- Power supply: 3.3-5V
- Current: 2.5mA max use of current during conversion (when data request)
- Humidity range: 20 – 90% ± 5%
- Temperature range: 0 – 50º ± 2%
- Sampling rate: ≤ 1 Hz
Liquid Crystal Display (LCD)
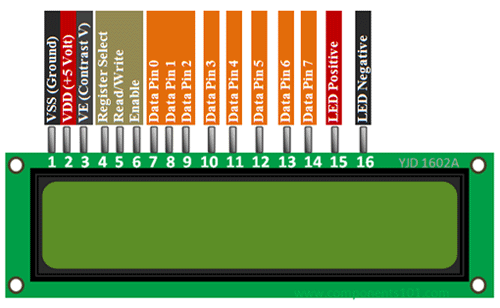
 Photo Credit: Components101
As shown in the image above, the pins of the LCD have different functions.
Pins 1 and 2 – These are the ground and 5V source pins to power up the LCD.
Pin 3 – It’s connected to the middle leg of a 3-pin trimmer resistor/potentiometer to adjust the LCD brightness.
Pin 4 – The register select is usually connected to the microcontroller, in this case, the Arduino, to shift between command/data register.
Pin 5 – It’s used to read/write the data. If you’ll only use this to write data to the LCD, you connect it to a ground.
Pin 6 – It’s connected to a microcontroller pin to toggle between 1 and 0 for data acknowledgment.
Pins 7 to 14 – These are the 8-bit data pins connected to the microcontroller to send data. You can also use it in a 4-bit mode by only using 4 of these 8 pins. In my case, I only used pins 11-14.
Pin 15 and 16 – These are the backlight LED pin positive and negative terminal respectively.
Technical Details (20×4 LCD)
- Operating Voltage: 4.7V to 5.3V
- Current consumption: 1mA (w/o backlight)
- Can display alphabets, numbers, and custom-generated characters
- Consists of four rows and each row can print 20 characters (or 2 rows and 16 characters for 16×2)
- Each character is built by a 5×8 pixel box
- Works on both 8-bit and 4-bit mode
- Available in Green and Blue Backlight Display
What is relative humidity?
DHT11 measures relative humidity. Relative humidity is the current density of water vapor in air vs the density of water vapor at saturation point. At the saturation point, the air is full of water vapor and can’t hold more water anymore, resulting in a dew on surfaces of objects.
To solve the relative humidity:
100% RH means that the air is full of water vapor. In contrary, 0% RH means that the air is dry.
What is heat index?
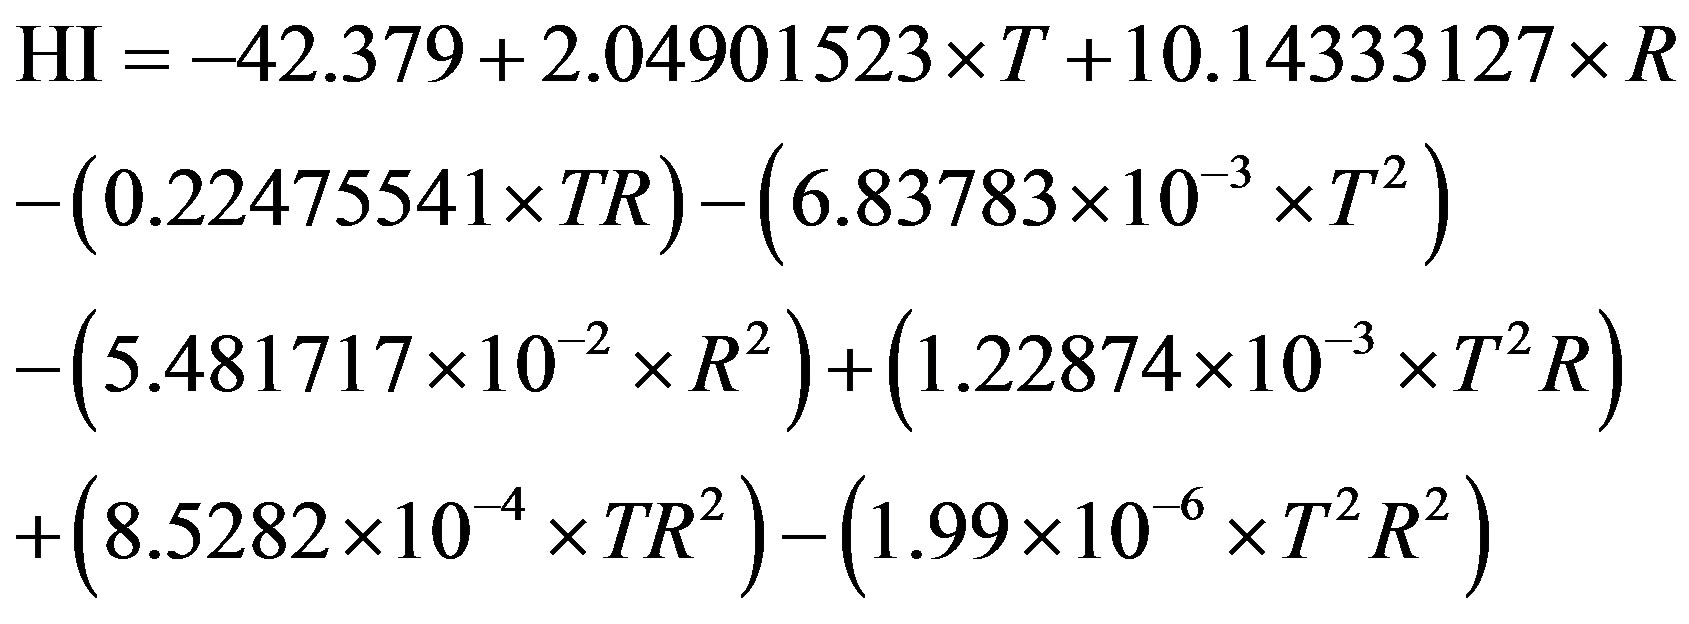
The heat index, also known as the apparent temperature, is the temperature relative to the human body when relative humidity is combined with the air temperature. This has important considerations for the human body’s comfort. The relative humidity helps in adjusting the temperature of the body. When the body perspires, sweat comes out to lower the body temperature. When the relative humidity is too high, the process of cooling off of the body slows down because sweat is not evaporated easily. [2]

Photo Credit: Scientific Research Publishing
Set-up the Hardware
The wiring diagram is kind of a bit confusing but the details for pin configurations of the LCD and DHT11 are indicated in the notes in the picture above. Some DHT11 devices have 4 pins and 3 pins. I used a 3-pin DHT11 since it is now integrated into a module, just like what I’ve used. The 3rd leg in a 4-pin DHT11 is a null pin which doesn’t require a connection.
Code
Libraries included
DHT.h (DHT library by Adafruit)
This Arduino library supports the DHT series of low-cost temperature and humidity sensors (DHT11, DHT21, and DHT22) and AM2301 sensor. This library has a DHT_DEBUG command which prints out debug messages in the serial monitor of the Arduino. It also defines the type of sensor that you’re going to use. It also has a function that converts Celsius values into Fahrenheit and vice versa for Temperature and Heat Index.
LiquidCrystal.h (LiquidCrystal library by Arduino)
This library allows an Arduino board to control LiquidCrystal displays (LCDs) that has a Hitachi HD44780 (or a compatible) chipset, which is found on most text-based LCDs. The library works within either 4- or 8-bit mode.
Arduino code
Copy the code below into your Arduino IDE and press the upload button. Arduino code is from Adafruit website. Some parts are edited.
// Example testing sketch for various DHT humidity/temperature sensors
// Written by ladyada, public domain
#include <LiquidCrystal.h>
#include "DHT.h"

#define DHTPIN 7     // what digital pin we're connected to

// Uncomment whatever type you're using!
#define DHTTYPE DHT11   // DHT 11

LiquidCrystal lcd(12, 11, 5, 4, 3, 2);
DHT dht(DHTPIN, DHTTYPE);

void setup() {
  Serial.begin(9600);
  //20 by 4 character display
  //If you're using a 16x2 display, change it to lcd.begin(16,2);
  lcd.begin(20,4);
  Serial.println("DHT11 test!");
  dht.begin();
}

void loop() {
  // Wait a few seconds between measurements.
  delay(1000);

  // Reading temperature or humidity takes about 250 milliseconds!
  // Sensor readings may also be up to 2 seconds 'old' (its a very slow sensor)
  float h = dht.readHumidity();
  // Read temperature as Celsius (the default)
  float t = dht.readTemperature();
  // Read temperature as Fahrenheit (isFahrenheit = true)
  float f = dht.readTemperature(true);

  // Check if any reads failed and exit early (to try again).
  if (isnan(h) || isnan(t) || isnan(f)) {
    Serial.println("Failed to read from DHT sensor!");
    return;
  }

  // Compute heat index in Fahrenheit (the default)
  //float hif = dht.computeHeatIndex(f, h); //Remove the comment bars if you want Fahrenheit as output heat index

  // Compute heat index in Celsius (isFahreheit = false)
  float hic = dht.computeHeatIndex(t, h, false);

  dht.read(h);
  dht.read(t);
  dht.read(f);
  dht.read(hic);
  lcd.clear();
  lcd.setCursor(0,0);
  lcd.print("Humidity: ");
  lcd.print(h);
  lcd.print(" %");
  lcd.setCursor(0,1);
  lcd.print("Temp (C): ");
  lcd.print(t);
  lcd.print(" C");
  lcd.setCursor(0,2);
  lcd.print("Temp (F): ");
  lcd.print(f);
  lcd.print(" F");
  lcd.setCursor(0,3);
  lcd.print("Heat Index: ");
  lcd.print(hic);
  lcd.print(" C");

  //Serial monitor output
  Serial.print("Humidity: ");
  Serial.print(h);
  Serial.print(" %\n");
  Serial.print("Temp (C): ");
  Serial.print(t);
  Serial.print(" C\n");
  Serial.print("Temp (F): ");
  Serial.print(f);
  Serial.print(" F\n");
  Serial.print("Heat index: ");
  Serial.print(hic);
  Serial.print(" C\n");
  Serial.print("___________________________\n");
 }
Code breakdown
#define DHTPIN 7
#define DHTTYPE DHT11
This defines the connection of the Out pin (DHT11) to the Arduino pin connected (pin 7). It also defines the type of DHT sensor that we’re going to use which is DHT11.
LiquidCrystal lcd(12, 11, 5, 4, 3, 2);
DHT dht(DHTPIN, DHTTYPE);
LiquidCrystal lcd(rs, en, data pin 4, data pin 5, data pin 6, data pin7)
12 = Register Select Pin is connected to Arduino pin 12
11 = Enable Pin is connected to Arduino pin 11
5, 4, 3, 2 = LCD Data pins are connected Arduino pins 5, 4, 3, and 2.
DHT dht(DHTPIN, DHTTYPE) is a function that calls the DHT11 sensor through the pin 7 of the Arduino.
Conclusion
There you have it! A simple humidity and temperature sensing project that can be assembled and played within 5 minutes. LCD is a good device to display data or messages instead of having to check your serial monitor every now and then. You can compare the data output in the serial monitor and the LCD. Click the magnifying glass on the top right of the Arduino IDE to display the serial monitor window.

References:
[2] https://www.weather.gov/ama/heatindex
The post Humidity and Temperature Sensing using DHT11 and 20×4 LCD Display on Arduino UNO appeared first on CreateLabz.


