

Overview
3D printers are very useful both as a professional tool or as a DIY tool for beginners. It can be used for educational purposes like making scale models and even building businesses around making 3D printed models on demand or earn money through printing specific projects.
Creality is one of the few companies that manufacture highly affordable, easy to assemble 3D printers that has compact design with decent print volume. Ender 3 from Creality, as it is a perfect example of anything that can be a budget 3D printer.
The Creality Ender 3 Complete Kit is designed to encourage creativity and innovation that is ideal for beginners, students, teachers, and even businessmen.
Unboxing
If you can assemble your own computer table, it means that putting Ender 3 together is a no brainer. Even those with little 3D printing experience will be able to design, calibrate, and set up an Ender 3.
If you want to explore and try the world of 3D printing, purchase your own Creality Ender 3D Printer at Createlabz store, for a very compact and well packaged product!


The kit contains all the parts you need to build, as well as a bunch of equipment and accessories. It comes with standard carton package, 1 box tools, free 200g PLA filament, SD Card, manual, and after-service/warranty card. You really don't need anything else to bring the system together and print your first model.
Hardware
- Display Screen
- Power Supply
- Z passive block
- Base Frame
- Extruders
- Profiles
- Power Supply Cord
- Scraper
- Consumables and Tool kits
The materials are labeled at the photos below:


For more information about the hardware visit Creality Ender 3 at Createlabz store or the official website of Creality.

Assembly
Every part is clearly labelled, so you're not going to worry which part is where. You can find the instruction manual sheet in the package (see image below), which is very helpful. Additional manuals and troubleshooting guides can be found on the SD card included with Ender 3.


In this segment, I'm not going to go through the intricate setup of the Ender 3, but I'm going to point out a few things to look out for in the assembly process so that you can get the Ender 3 completed in less than half an hour, depending on your experience.

These are the five things to look out for while assembling!
-
Start by opening and connecting the extrusions to the base component/frame, this portion is one of the important elements, as it will serve as the foundation for your Z-axis profiles and your power supply. One of the extrusions has two holes at the bottom, which will be on the left side of the printer, and the other has two holes up to one side, which would be on the right side of the printer (see image below). Bear in mind that the extrusions are not interchangeable; ensure they are placed in their respective positions.

- Before mounting the power supply, make sure to check first whether the switch is in the correct voltage for your location, there are two options, 115V and 230V.
Using the M4 by 20 screws, attach the power supply to the right side of the extrusions, keep in mind on choosing the right screws and allen keys to secure the installation, screw them in place but not tight enough as the screws can be easily stripped from the power supply.

- For formatting the display module, you need two M5 by 8 screws that will simply be threaded into the two holes on the front of the display which is located on the right side of the printer. The back of the module has three connectors, but you won't need them all in your first setup, just attach the LCD cable to the nearest connector inside of the printer.

- Don't be intimidated and overwhelmed by installing the Z-axis profile and extruder, it might seem complicated, but if you follow the instructions on the manual, it'll be as easy as ABC.
One thing that needs to be remembered is to make sure that the extruder's motion feels linear and that there are no wiggly or visible bumps.
-
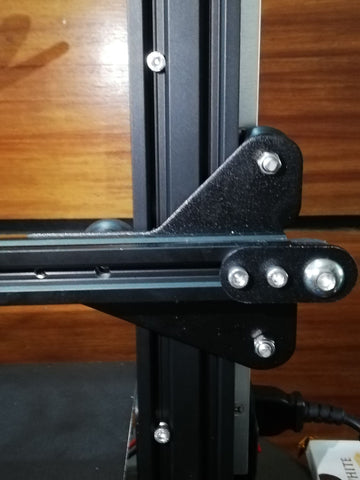
Lastly, connect the remaining 20 by 20 extruder and connect them to the top of the printer. Notice that the holes are not the same, the other side is bigger for it is for the M5 by 25 screws. There are two end caps which will be attached on the side of the extrusions, make sure to attach them correctly for it will just plug into place. The top extruder will also hold the spool holder to carry a whole roll of filament.

We're almost set for our first printing!
But before that, don't forget the two key things that I've come across for a seemingly first print!
- Adjusting the knobs
Checking whether your base component or bed is properly leveled is a must; you can see in the picture below that the angle of the bed is 0 degrees. The level print bed is a vital part of this as it allows the material to extrude uniformly over the entire surface of construction.

- Adjusting the distance of nozzle to the bed
Using paper to set the height of the nozzle above the bed in each corner is a common method used by many 3D printing hobbyist.
Move the extruder over each corner and slip a piece of paper under the nozzle. If it is not rubbing or sliding, turn the button clockwise to raise the corner, if the paper is too tight or does not slide under the nozzle, turn the button anti-clockwise to lower the bed. This procedure will help make sure that the filament will stick on the bed while printing.

Now that the Ender 3 is ready, let’s start printing!
Printing
Alright, time to get to the fun part which is printing on the Creality Ender 3!
Setting up the Printer is a no biggie. Just follow these simple steps: PREPARE, CONTROL, and PRINT!
- PREPARE
Anything should start from somewhere or at the beginning. Start by clicking the ‘Prepare’ on the display module and select ‘Auto home’.

- CONTROL
Set the temperature of your bed and nozzle by clicking the ‘Control’. The preferred temperature for nozzle and bed are 200 degrees Celsius and 65 degrees Celsius, respectively.

After setting up the temperature, select your desired output by clicking in the Print from TF stored from your SD card.

If you're a newbie in the 3D printing world and still don't know what to print, try these two software tools as it will surely help you create your first output.
Software Tools Used to Jumpstart 3d Printing
- Thingiverse
Thingiverse is a place to share digital design files created by users. Good thing, we provided free filaments to test out your first output. This Pikachu from Pokemon is what we are going to test for our first printing trial.

- Ultimaker Cura
Ultimaker Cura is the slicing app created for 3D printers. Anyone can download it from their website for FREE. The app can also adjust the size and position of the output. It can even measure the printing time!

After a quick 35-minute printing we can now see the result. Remember to use the provided scraper to remove properly the output print.

With a little touch of sand paper and cleaning, the Ender 3 produces a nice quality of 3D printing!
Conclusion
Most 3D printers are either fully built or packaged, but Ender 3 is somewhere in the middle. Most of the pieces are pre-made and need to be constructed. Preferably, I recommend this form of setup, assembling your own 3D printing would be a major help in the long term, troubleshooting in the future would be simpler as you know how to disassemble and reassemble it.
The model is minimal and slick, best for those who love aesthetic design. Quality is decent, clean and stable. Overall, a five-star recommendation!
Here’s a brief overview of the specifications for Creality Ender 3:
|
Reference
Creality Leading 3D Printer Supplier & Manufacturer | Creality 3D
Cura Slicing Software Review (3dstartpoint.com)


